
4. Moodle Integration
Throughout this section of the document are the details for getting your Moodle instance connected to eReserve Plus. It’s very important to read all of the details in Installation (see section 2 of this document) and complete all of the activities in this section which will result in a successful connection to eReserve Plus. Should you have any questions please contact the eReserve Support Team at support@ereserve.com.au
4.1 Requirements
The eReserve Plus LTI Tool is regularly tested with the releases supported by Moodle. It is recommended that you use a Moodle supported version of Moodle however the eReserve Plus LTI Tool has been tested with earlier Moodle versions without incident. It is important to note that we will not be testing against older versions of Moodle as where support has been withdrawn by Moodle.
4.2 LTI Management
In order for course maintainers link to a Reading List in eReserve Plus for their courses you will need to create a configuration in the Moodle LTI Management interface. To get to this interface you will need to be logged into Moodle as an Administrator then navigate to the following location in Moodle:

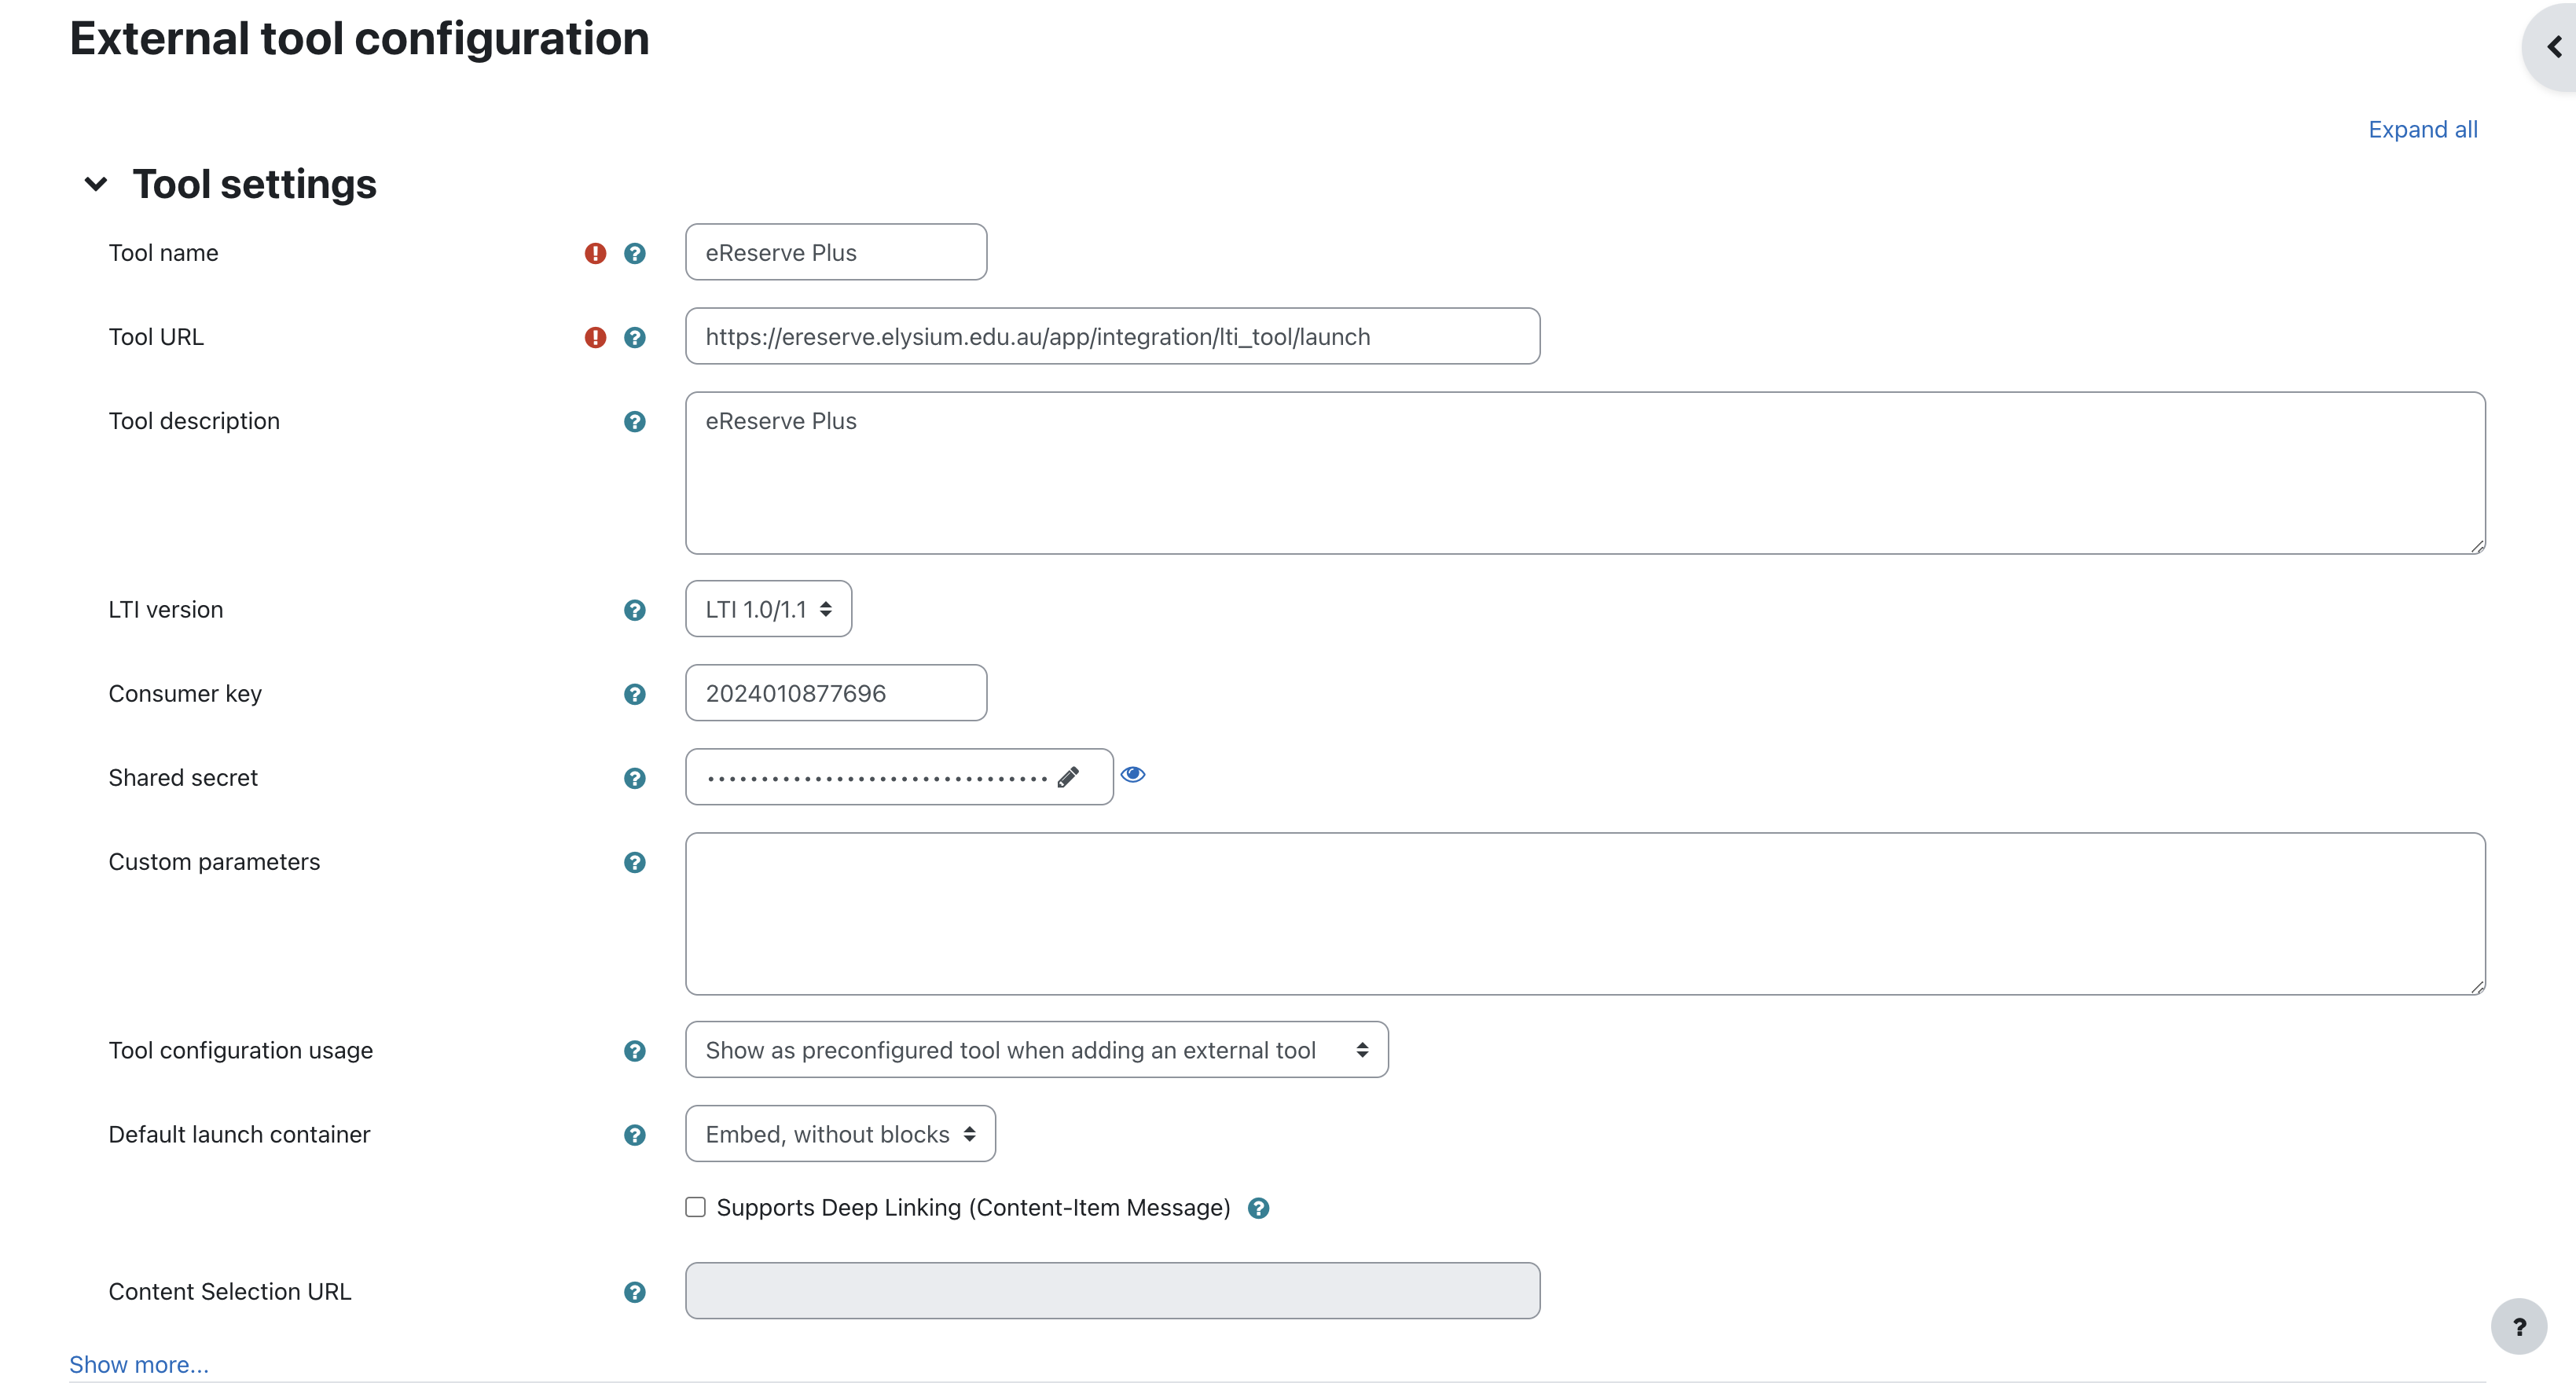
Click on the configure a tool manually then fill out the form as follows:
Tool Settings
-
Tool Name - You can name this as you need but we recommend eReserve Plus
-
Tool base URL - This URL will be provided by the eReserve Support Team along with this document.
-
Consumer Key - The key in the integration record that you created earlier.
-
Shared Secret - The secret in the integration record that you created earlier.
-
Launch Container - This is how the External Tool will be displayed. Below are the options:
- Default - If in doubt, leave as default;
- Embedded - The External Tool will be embedded in the Moodle course page with blocks and navigation bar;
- Embedded without Blocks - The External Tool will be embedded in the Moodle course page but without blocks;
- New Window - The External Tool will open in a new window (A new window or tab will open with the External Tool and the old browser window containing the course page will not change.)
Tip: It is our recommendation that you configure the Launch Container to be Embedded without Blocks as a default to ensure the Reading List size available to users is optimised.
Privacy
-
Share launcher’s name with tool - This is set to Always for eReserve to pre-populate reading requests with a User's name.
-
Share launcher’s email with tool - This is set to Always for eReserve to pre-populate reading requests with a User's email address.
-
Force SSL - All communication with eReserve Plus is done over SSL so this needs to be ticked.

NB: eReserve Plus does not store Student emails or names. These settings are purely for recording reading requests from Academics.
Once you have completed the form just click on the Save Changes button. You’re now ready to create a link in a course.
4.3 Course Link to Moodle
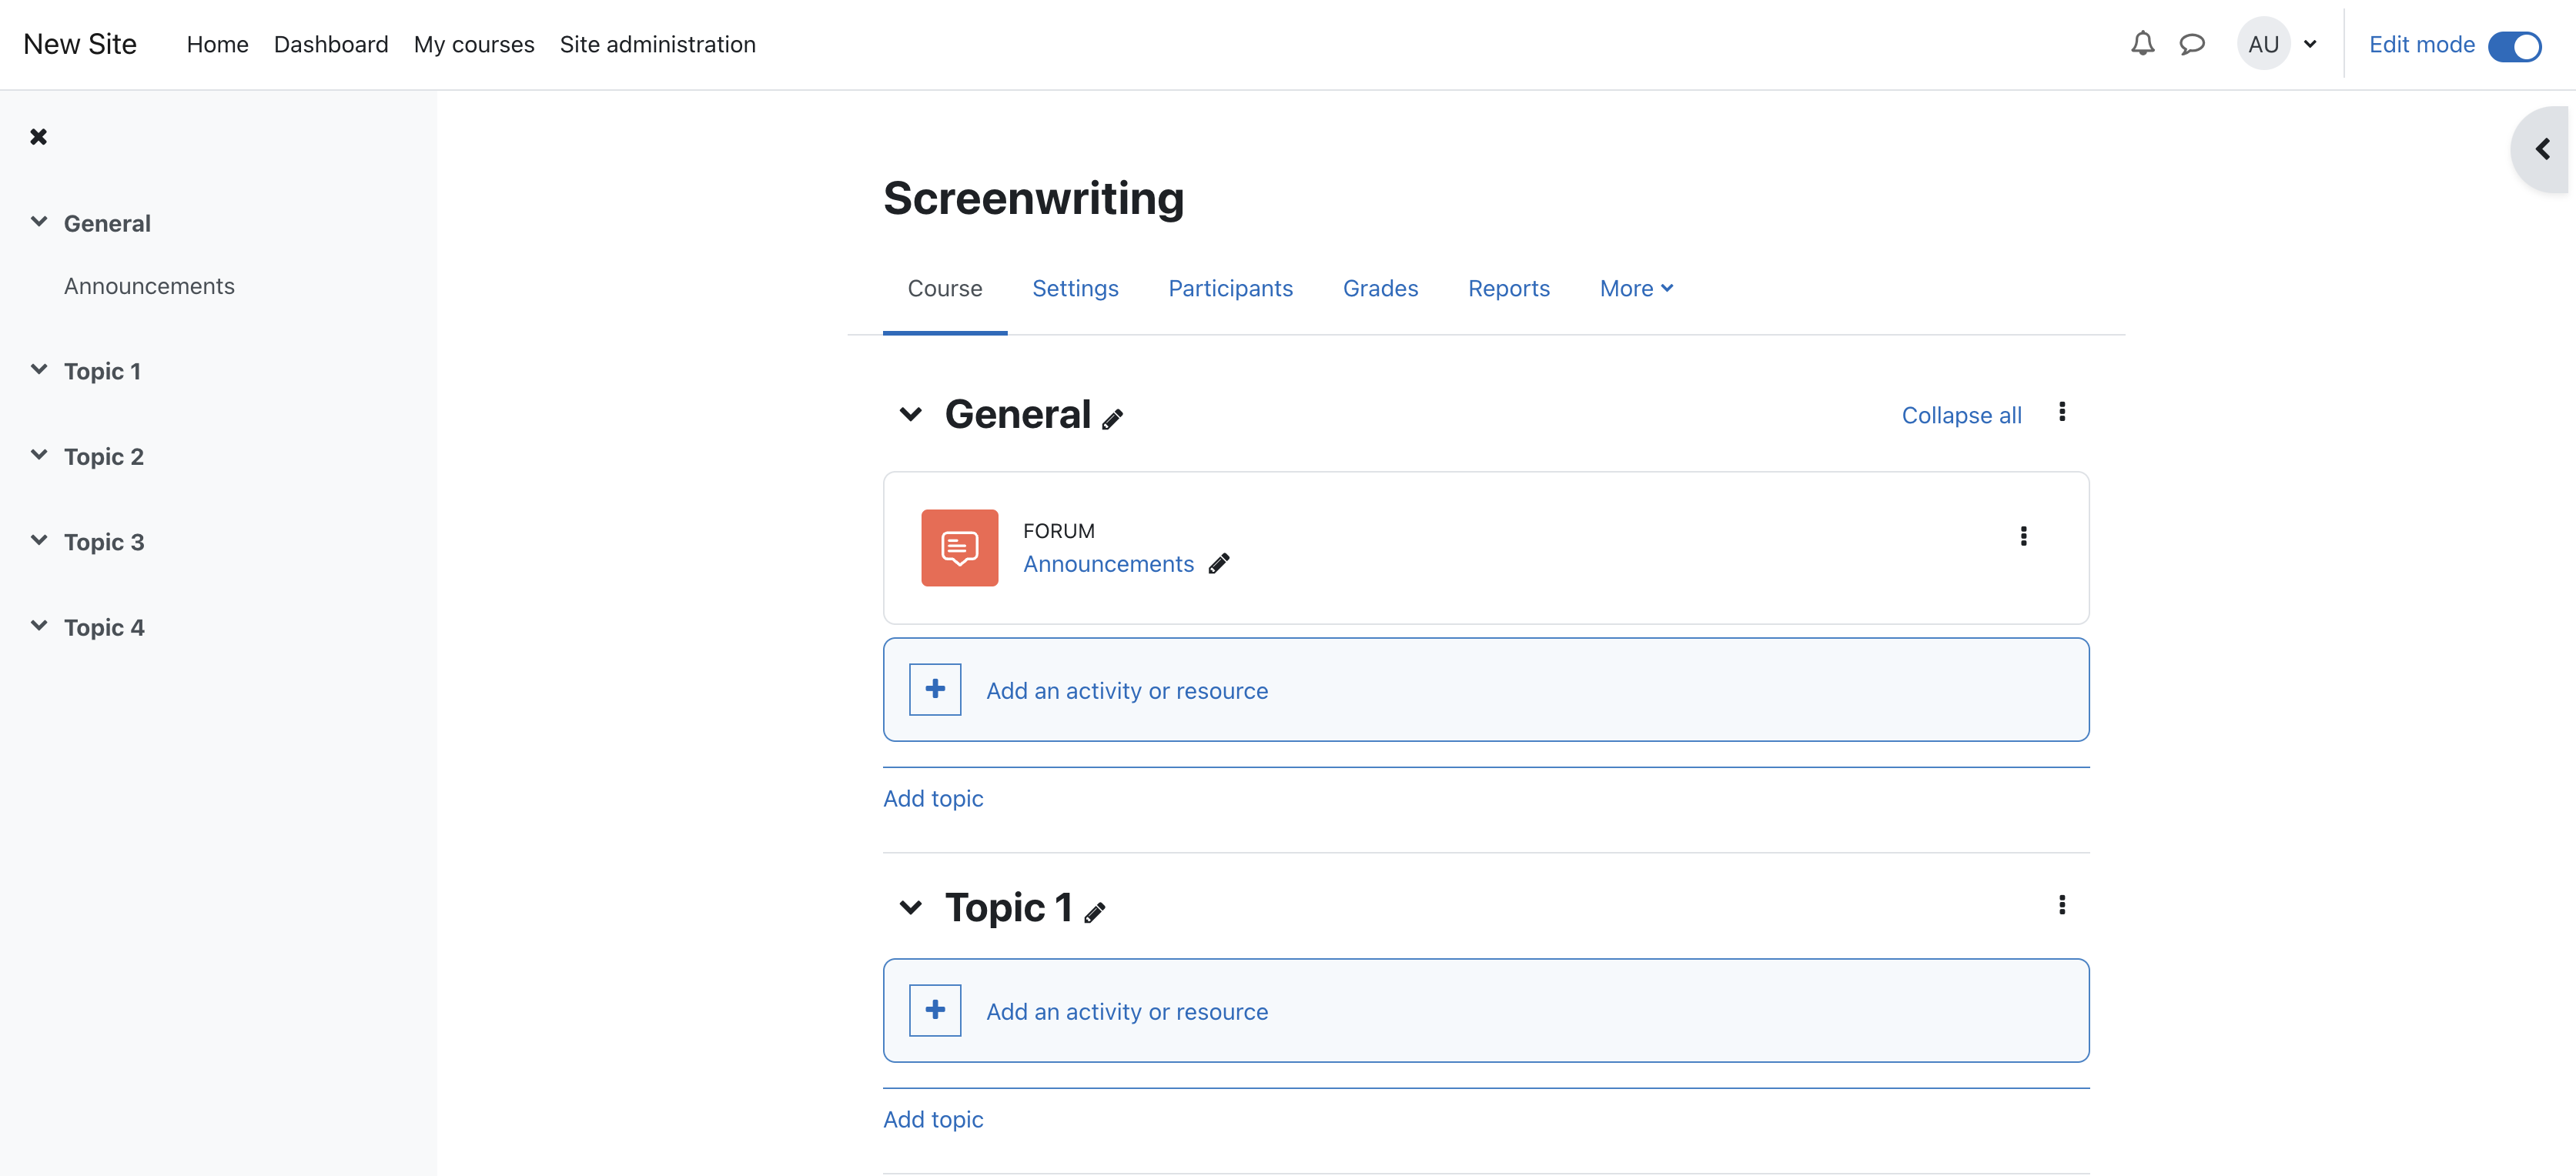
The LTI Tool integration in Moodle is treated as an 'Activity'. So for those who maintain the course, its just a matter of adding a new activity in an appropriate location in Moodle. Just navigate to the course in question then click on the Turn editing on button, if you haven’t already. Once in edit mode just click on Add activity or resource link.
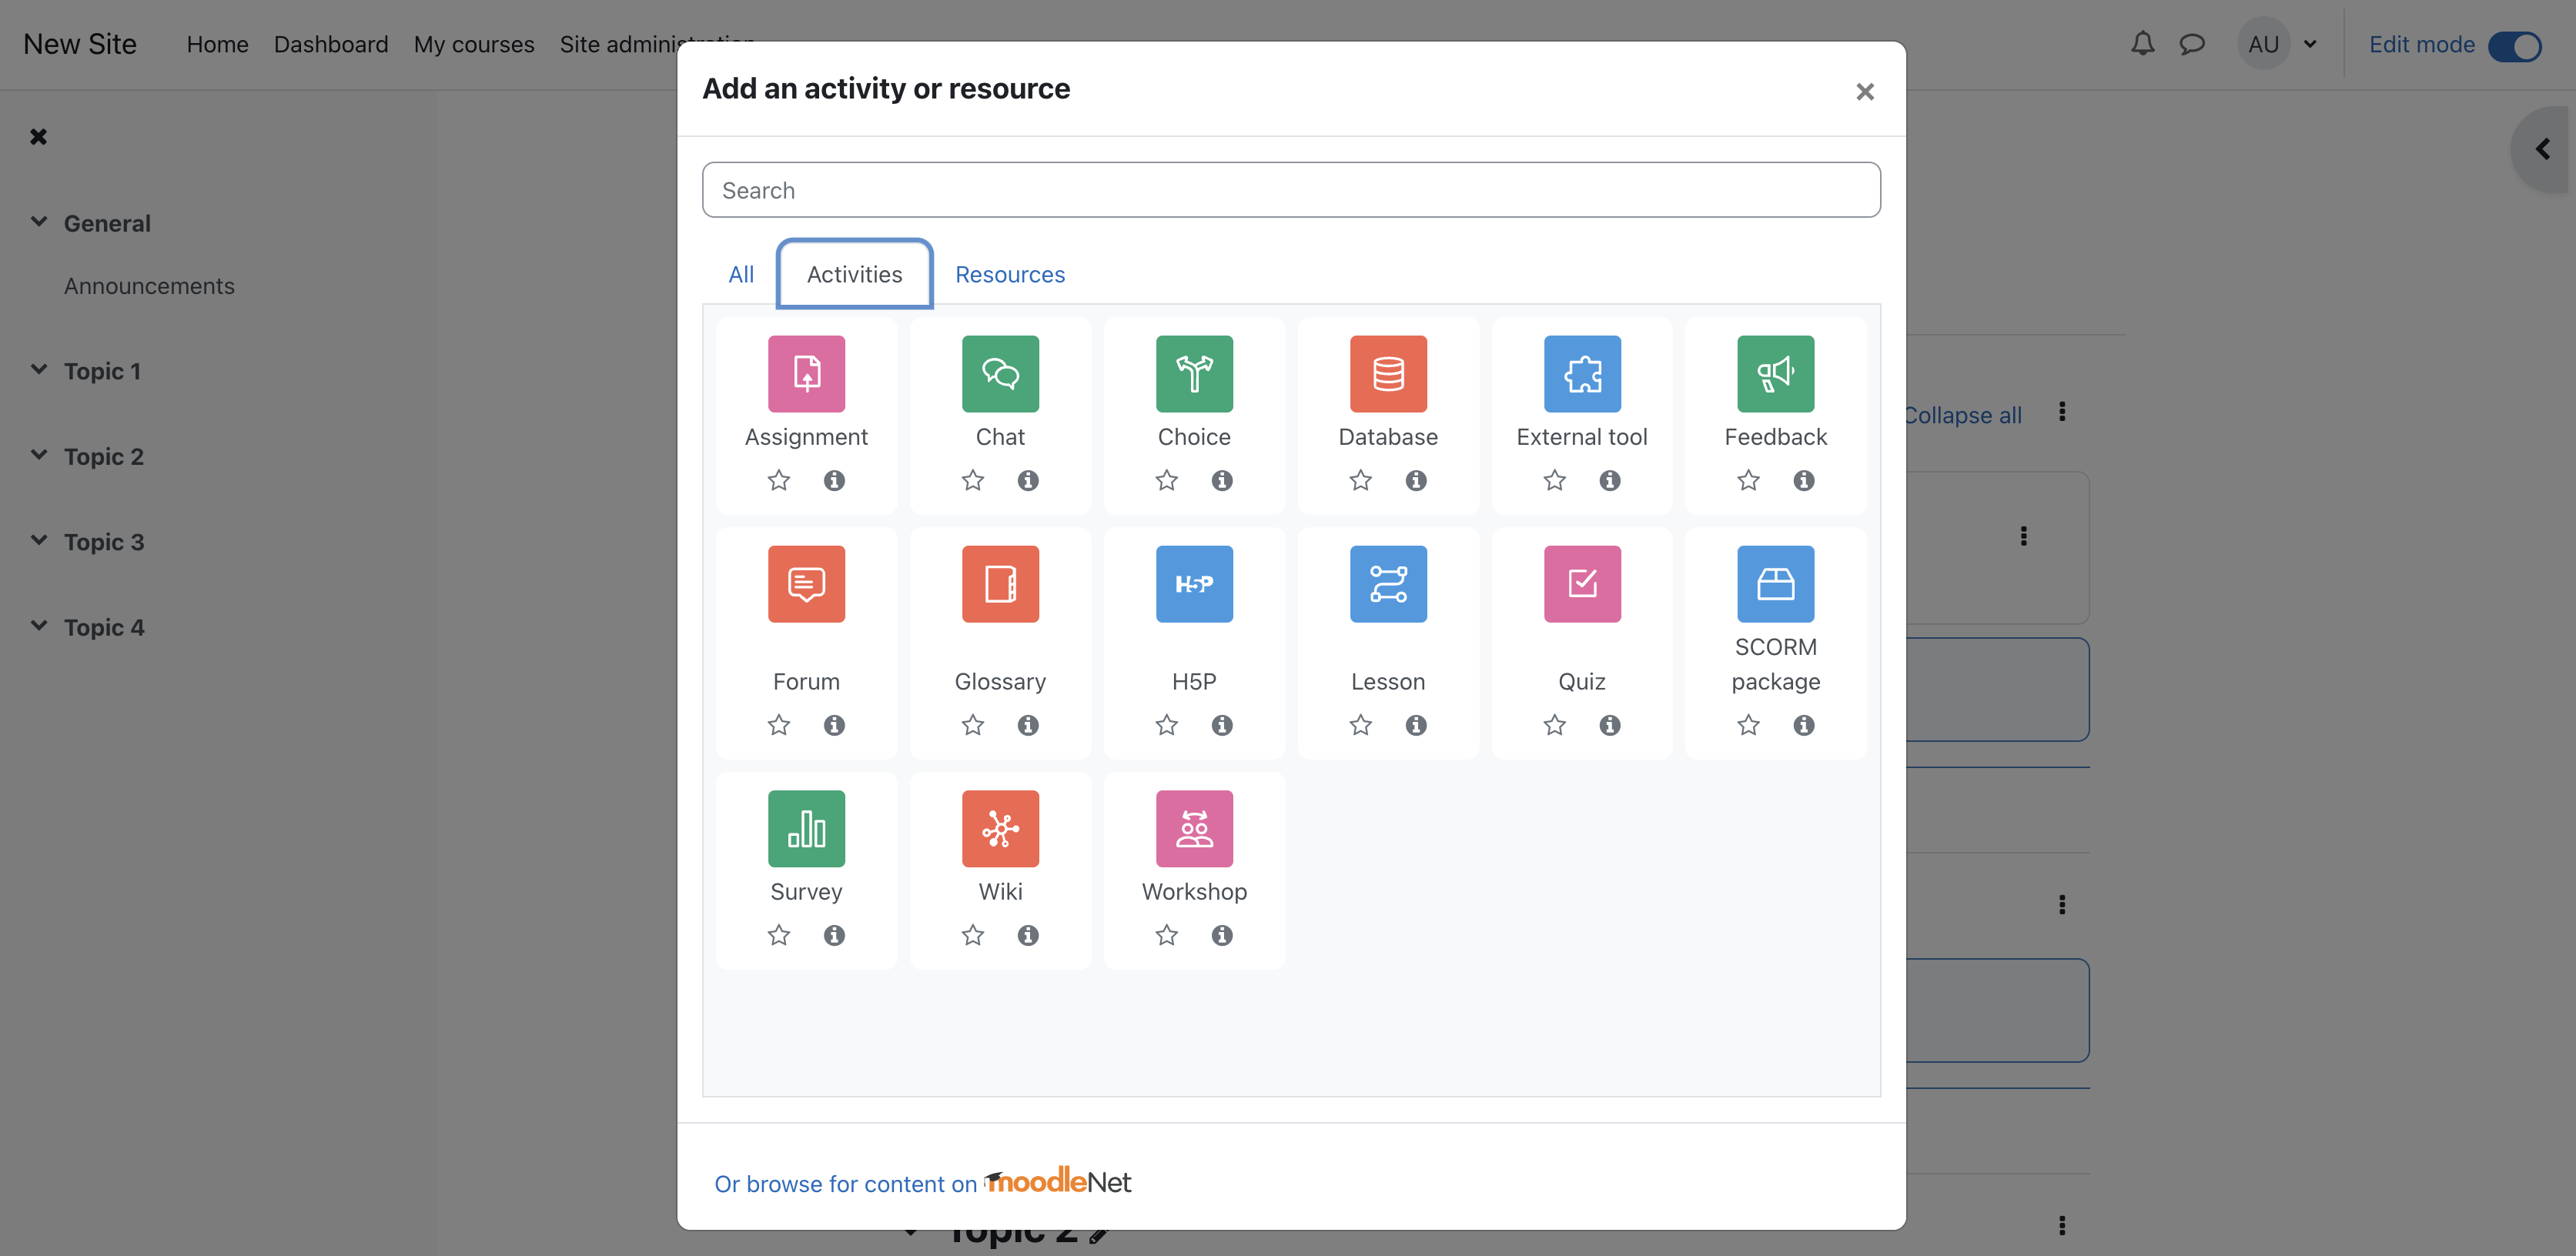
Once you’ve clicked on the link you’ll see the Add an activity resource dialog displayed (see below). Choose the External tool option then click the Add button.
The Adding a new External tool form (see below) will be displayed. Fill it in as follows
- Activity Name This name can be chosen by the course maintainer but we recommend eReserve Plus or Reading List
- External tool type To use the configuration you created earlier just select the eReserve Plus option.
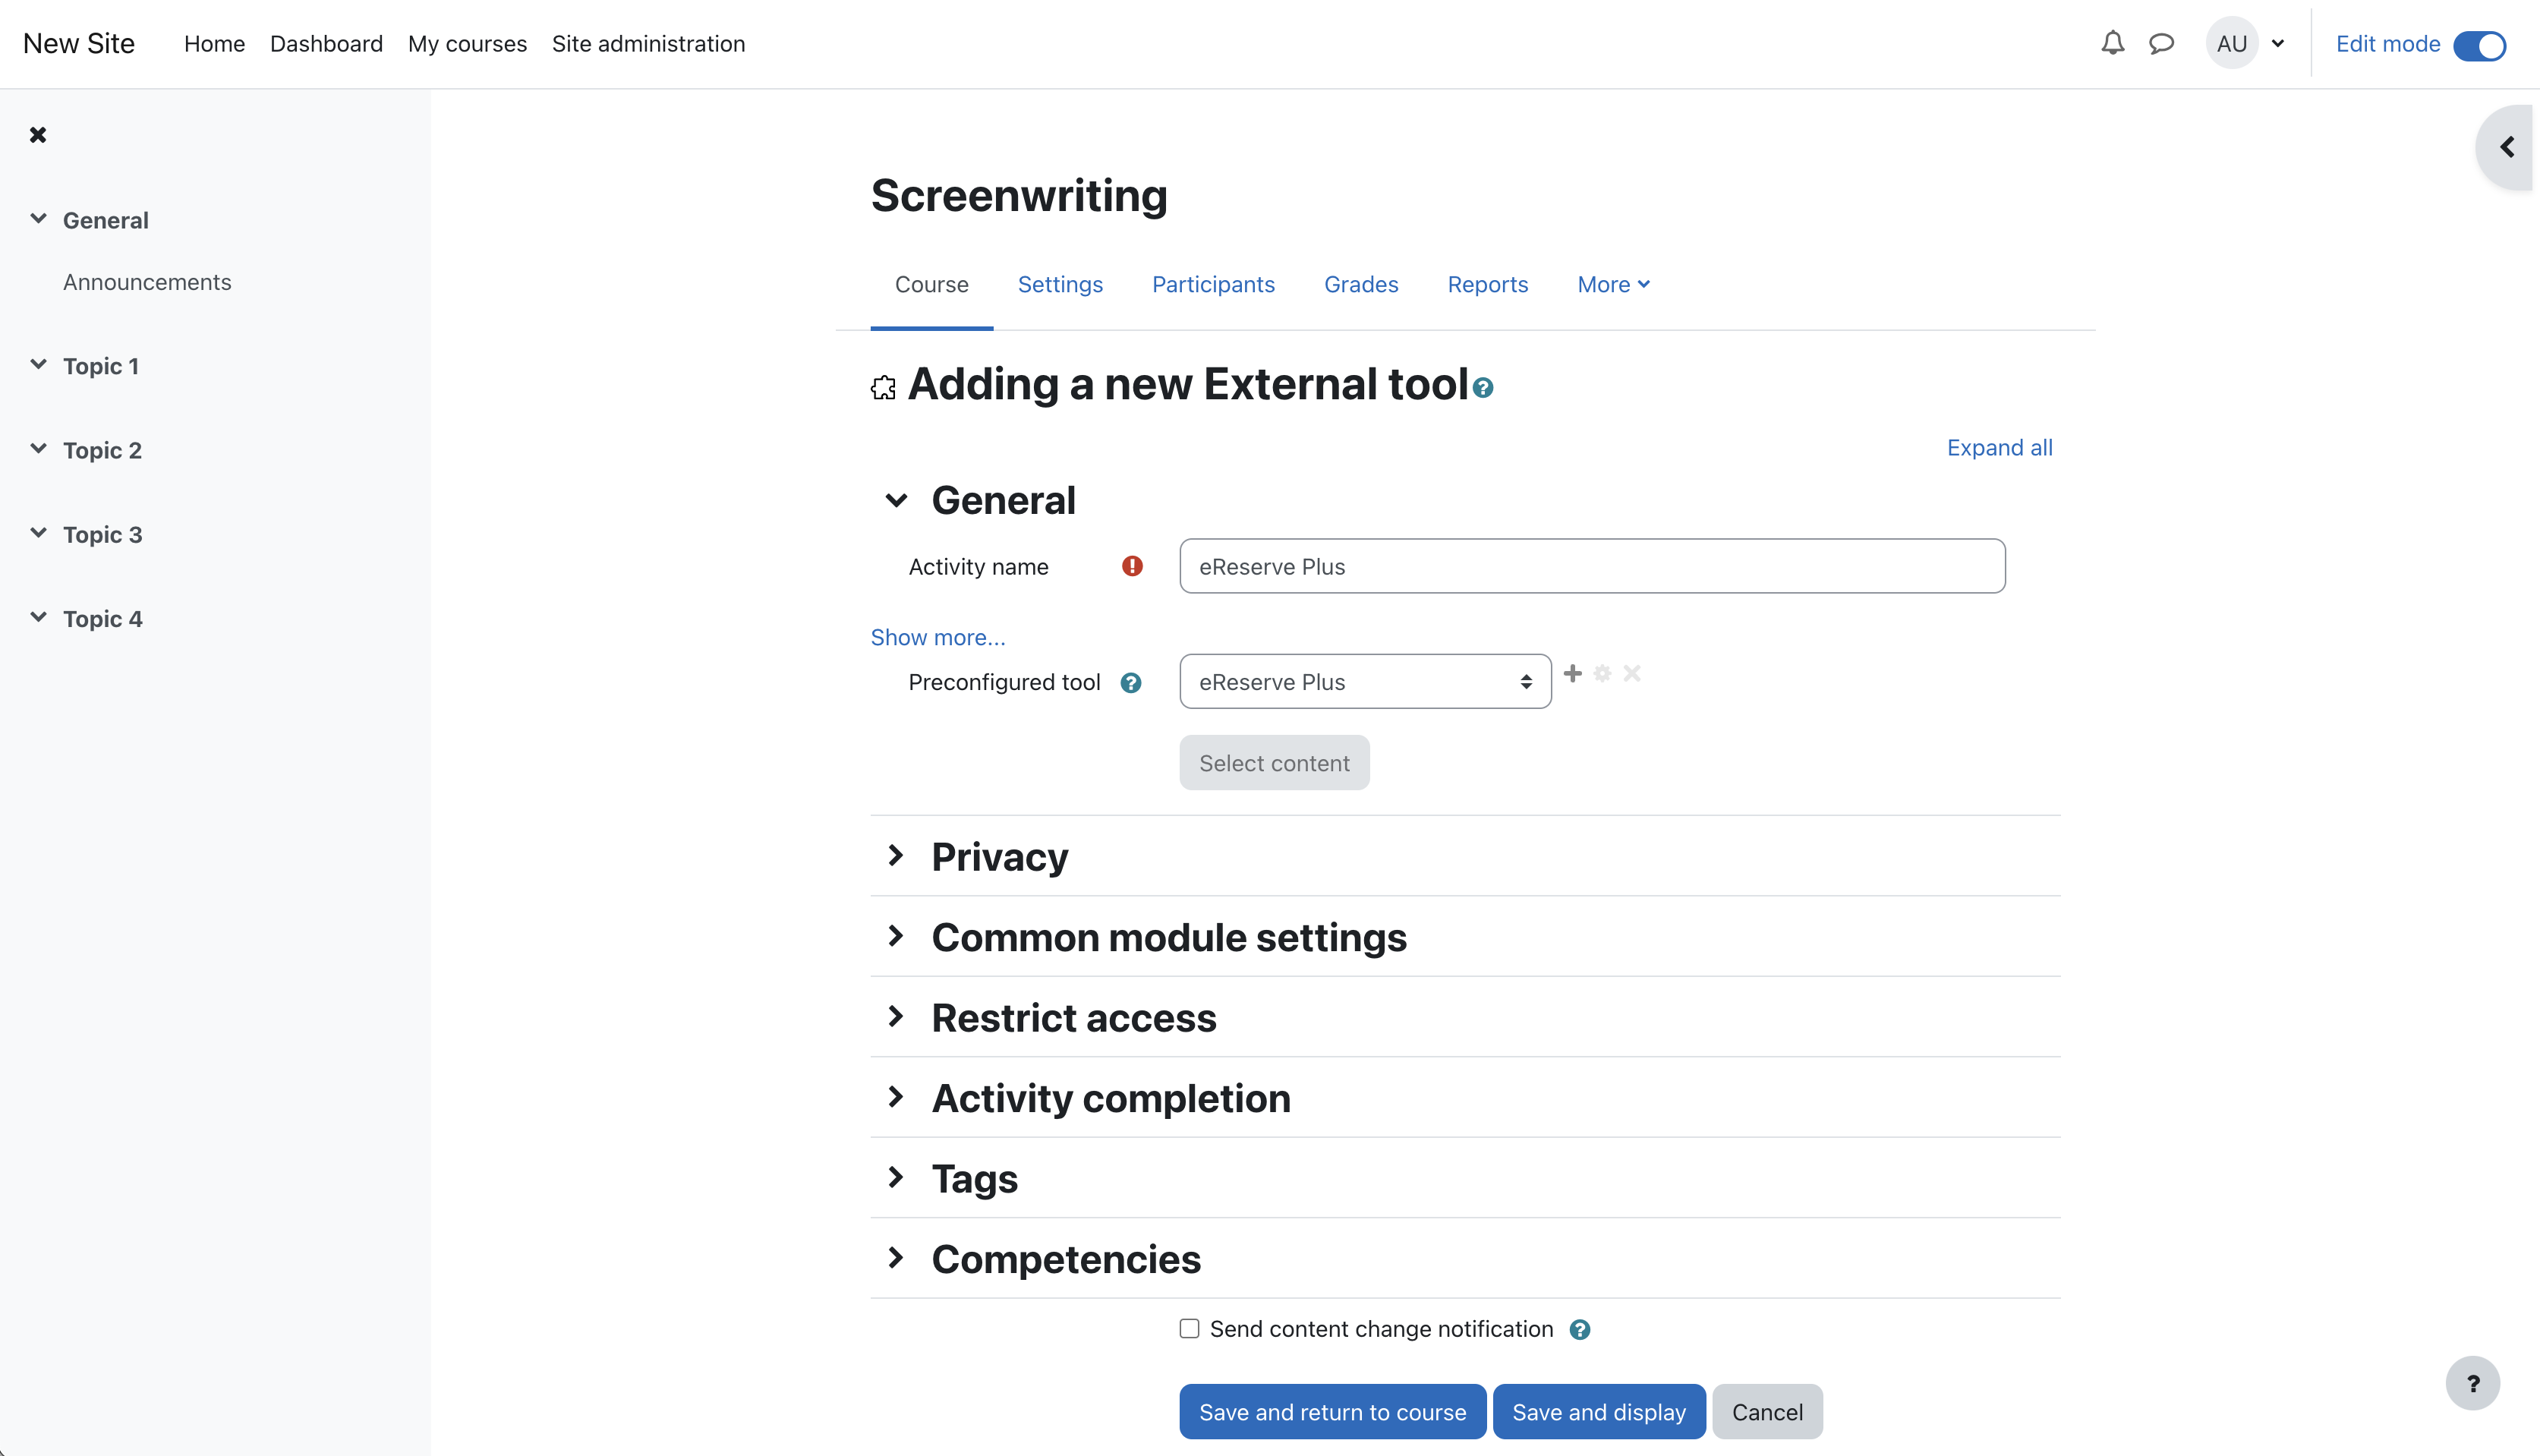
All other options can be left with their defaults. Click on Save and return to course and you're done. Now onto activation of your integration record.
4.4 Integration Record Activation
This is the final step and the most important one. It binds your Moodle Instance to the integration record within eReserve Plus. To do this is very simple, it’s just a matter of clicking on the link you created in the course. If you’ve chosen the Embed option then you’ll see something like the page below for those who have access to manage the Reading List.
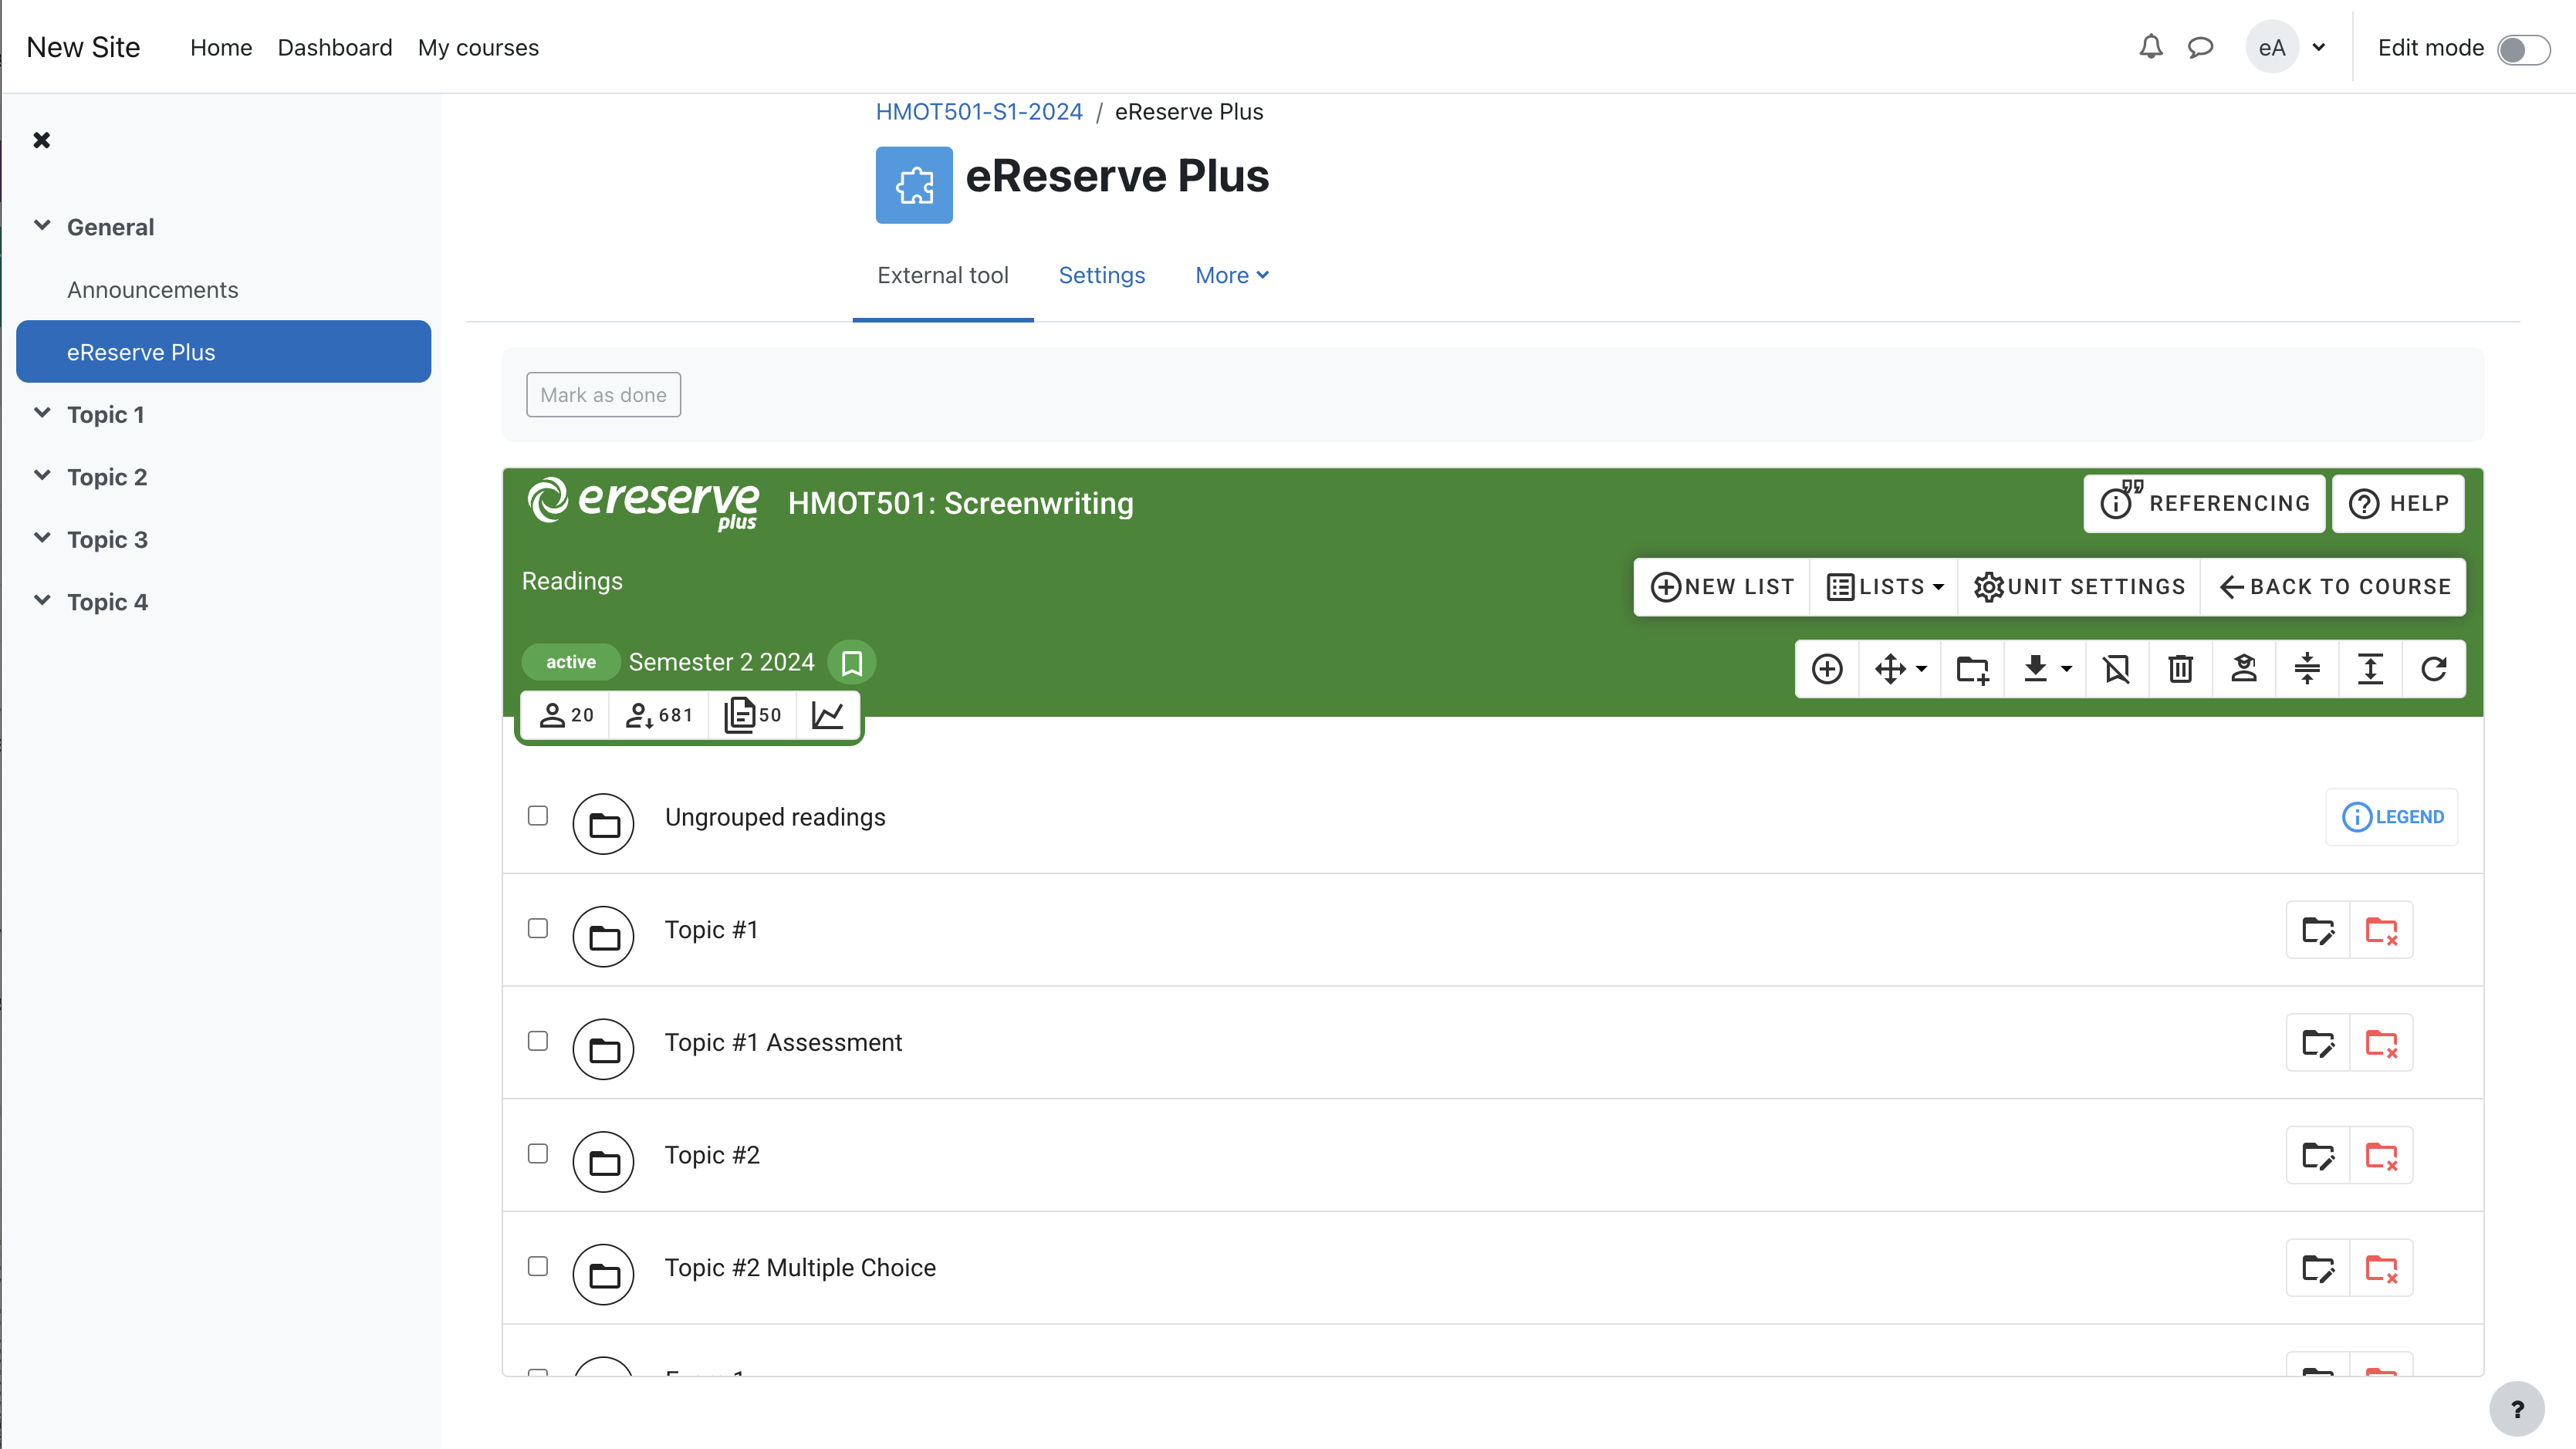
Once this has been done if you return to eReserve Plus and navigate to Configure > Integrations you’ll note the integration record has been activated with the details of your Moodle Instance.
Before activation:

After activation:

Now that your integration record has been activated it’s important to configure it correctly so please read 2.3 Reading list access management and 2.4 Reading lists and course codes to apply your desired configuration details.
4.5 Resource Linking with Moodle
There are four plugins which make Resource Linking for Academics and Teachers possible from Moodle:
-
eReserve Plus Local Plugin
This plugin contains all of the core functionality for the integration between the two platforms. For the end user this is where all of the configuration is done. -
eReserve Atto & TinyMCE Plugins
This plugin allows for integration with eReserve Plus. At this stage it focused on Resource Linking. To support the insertion of resource links (link to a list of one or more resources in eReserve Plus) this plugin provides a button that can be added to the Atto editor (now the default editor for Moodle) and automatically added to the TinyMCE Editor. -
eReserve Plus Filter Plugin This plugin will make sure that the correct details are used such as the Course ID and Reading ID when using Resource Linking.
Download the necessary installation files here
Prerequisites
To use these plugins you will need an eReserve Plus instance and Moodle 3.3.4 or later.
Installing the plugins
File Copy / Upload
To start the installation of the plugins you can use one of the two following methods:
-
File Copy
If you have access to the file system for the target Moodle instance then you can kickstart the installation by doing a simple copy in bash:$ cp -rf path/to/repo/lib path/to/moodle/lib $ cp -rf path/to/repo/local path/to/moodle/local -
Zip File Upload
With this method you will need to zip each of the plugins using the following steps in bash$ sh build.shAfter running the above script all of the zip files will exist in a
builddirectory. You can upload the zip files via the Moodle admin interfaceAdministration > Plugins > Install plugins. Once there, follow the on-screen instructions to do the installation.
Installation
After using either of the above methods to get the files onto your Moodle instance it's just a matter of visiting the Moodle administration page and Moodle will detect that the plugins need to be installed. Follow the instructions laid out by Moodle providing the settings, which are detailed in the Settings section of this document.
Atto Editor Post Installation
In order to have the eReserve Plus Resource Link button in the Atto Editor you will need to manually add it via the
Moodle administration. Navigate to Administration > Plugins > Text editors > Atto HTML editor > Atto toolbar settings.
Once on the page scroll down to the Toolbar config then place ereserve in where you want the button to appear. Following
is an example configuration (note ereserve on the files line of the config):
collapse = collapse
style1 = title, bold, italic
list = unorderedlist, orderedlist
links = link
files = image, media, managefiles, ereserve
style2 = underline, strike, subscript, superscript
align = align
indent = indent
insert = equation, charmap, table, clear
undo = undo
accessibility = accessibilitychecker, accessibilityhelper
other = html
Filter Plugin Post Installation
Once the filter plugin has been installed you will need to enable the filter. This can be done in the Moodle Site Administration using the following steps:
- Login as an administrator
- Navigate to
Site administration > Plugins > Filters > Manage filters - Locate the
eReserve Plus Filterthen changeActive?toOn - Move the
eReserve Plus Filterto the bottom of the list of active filters
Settings
General Settings
- eReserve Plus Host Name -
This setting is the fully qualified domain for your eReserve Plus instance (e.g. [ereserve].institution.edu.au). This will be supplied as part of your onboarding. NB: Please do not include the http:// or https:// portion of the URL
IMS LTI Settings
The following Consumer Key and Secret are generated in eReserve Plus by creating an integration record associated with this instance of Moodle. Creation of integration records can be done within the eReserve Plus admin interface via Configure > Integrations. For specific details please see the eReserve Plus documentation
-
Consumer Key
The Key from the associated integration record in eReserve Plus -
Shared Secret
The Secret from the associated integration record in eReserve Plus