3. D2L Brightspace Integration
Throughout this section of the document are the details on getting your Brightspace instance connected to eReserve Plus. It’s very important to read all of the details in section 2 of this document, and complete all of the activities in this section. Section 2 deals with the setup required on the eReserve Plus side, including the generation of the LTI Key and Secret. Should you have any questions please contact the eReserve Support Team at support@ereserve.com.au
3.1 Requirements
The eReserve Plus LTI Tool is regularly tested with the Brightspace releases supported by D2L. It is recommended that you use a D2L supported version of Brightspace however the eReserve Plus LTI Tool has been tested with earlier Brightspace versions without incident. This document covers configuration of Brightspace hosted by D2L.
3.2 LTI Advantage Access
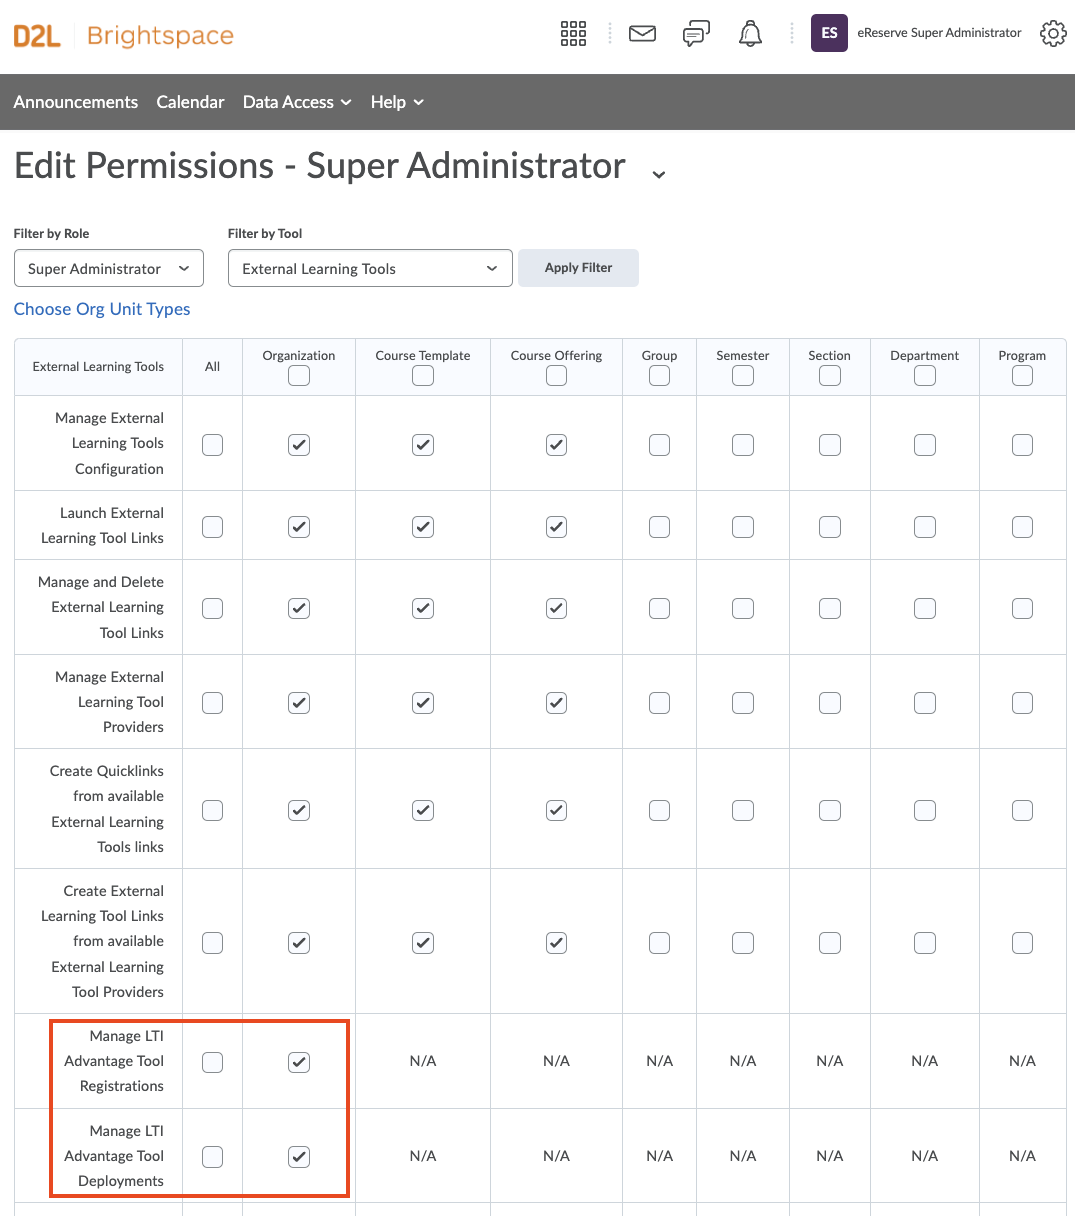
In order to configure and manage LTI Advantage Tools you will need to configure permissions on the roles for those staff performing these tasks. When logged in as the Super Administrator you do the following for the roles that need the access:
- Click on Roles and Permissions in the Security section of the admin settings menu.
- You will be presented with a table of roles.
- Select the role name that you want to give admin access and manage the LTI Advantage Tools and select External Learning Tools for the Filter by Tool option.
- Tick the two options for LTI Advantage Tools (see screenshot below)
- Click Save and Close

3.3 LTI Advantage Registration
To complete the registration of your eReserve Plus instance within D2L Brightspace, please follow the detailed instructions found here: Register an External Learning Tool for LTI Advantage
Below are some samples for the population of key fields on the registration form:
-
Name Enter a name to identify the registration is for your eReserve Plus instance. (e.g. eReserve Plus Staging)
-
Domain Enter the Domain of your eReserve Plus instance. (e.g. https://eu.ereserve.com.au)
-
Redirect URLs You will need to populate the following Redirect URLs
- Resource link Generation: https://eu.ereserve.com.au/app/integration/lti/resource_link/generate
- Reading List View / Manage https://eu.ereserve.com.au/app/integration/lti/reading_list/launch
- Resource Link View: https://eu.ereserve.com.au/app/integration/lti/resource_link
-
OpenID Connect Login URL You will need to populate the following URL:
- https://eu.ereserve.com.au/app/integration/lti/login
-
Keyset URL You will need to populate the following URL:
- https://eu.ereserve.com.au/app/integration/lti/public_jwk.json
-
Extensions Select the Deep Linking option only
-
Roles Tick Send Institution Role
Ensure that you enable the registration. You also need to take note of the Client ID, this will allow you to locate the registration within the integration records in your eReserve Plus instance.
3.4 LTI Deployment
Once the registration has been completed, Deployments and be created based on the registration. Following are the steps to creating a Deployment for eReserve Plus.
- Edit the created registration in Brightspace
- Scroll to the bottom of the page, and select View Deployments link
- You will be presented with a list of deployments, click on the New Deployment button
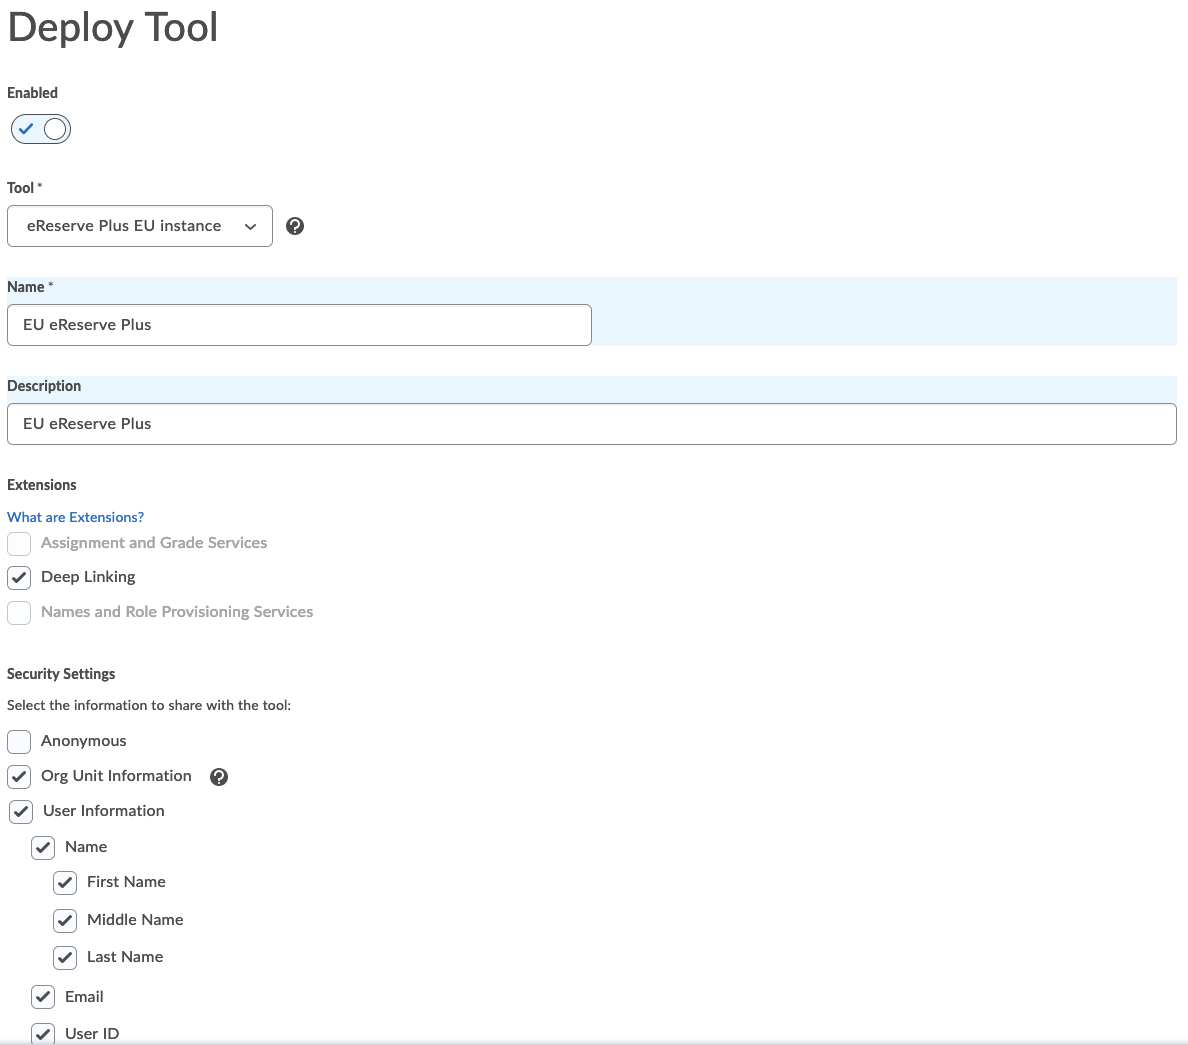
- The Deploy Tool form will be displayed. Complete the form as follows:
- Tool Select the registration (e.g. eReserve Plus Staging)
- Name Enter a name to identify the deployment is for your eReserve Plus instance (e.g. eReserve Plus Staging)
- Security Settings Tick all options except Anonymous
- Org Units Add the Org Units that will be using eReserve Plus
- Click in the Save & Close button

3.5 LTI Link Creation
Once the Deployment has been created, you will need to create links to allow access to eReserve Plus. This is completed on the links page for your deployment. To navigate to the Links page, for your deployment, use the following steps:
- Edit the eReserve Plus deployment in Brightspace
- Scroll to the bottom of the page, and click on the View Links page
- You will now see the Links page
Now that you are on the Links page you can create the required links. Follow these steps for each link.
List View/Management
This link can be used for the management of the list for a site when you have the role of Instructor or to simply view the list for the site when you have the role of Learner.
- Click on the New Link button
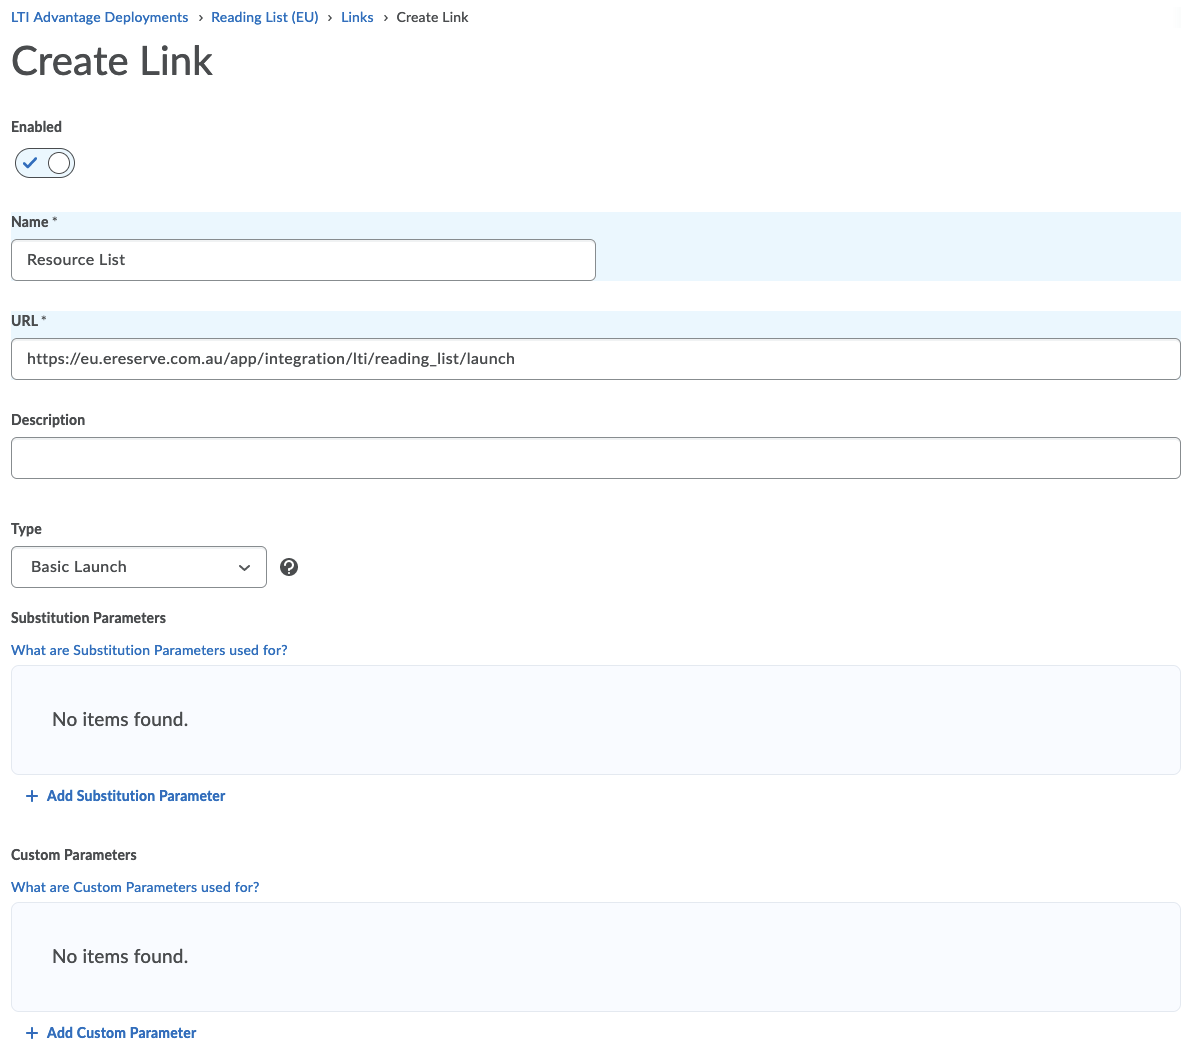
- Complete the form as follows:
- Name Provide a name to identify this is the List View/management tool (e.g. Resource List)
- URL https://eu.ereserve.com.au/app/integration/lti/reading_list/launch
- Type Choose the Basic Launch option
- Click on the Save & Close button

Resource Link Creation
This link allows Instructors to create new Resource Links in HTML Content
- Click on the New Link button
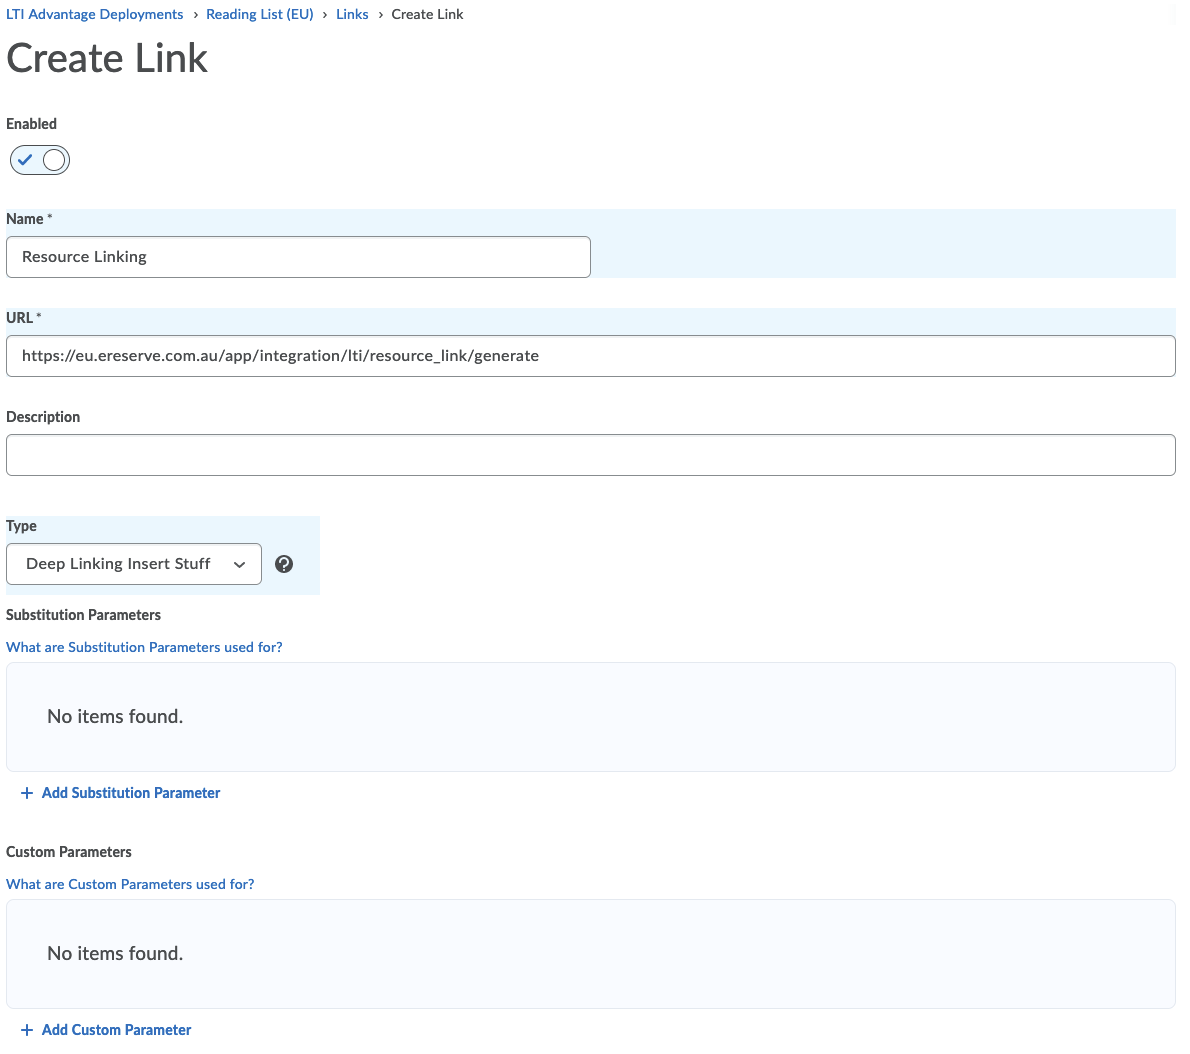
- Complete the form as follows:
- Name Provide a name to identify this is Resource Link creation tool (e.g. Resource Linking)
- URL https://eu.ereserve.com.au/app/integration/lti/resource_link/generate
- Type Choose the Deep Linking Insert Stuff option
- Click on Save & Close button

3.6 eReserve Plus Activation
To activate the registration record in eReserve Plus you will first need to make the List View/Management tool available in a site.
- Navigate to your site in Brightspace
- In the site content, click on the Existing Activities button
- Choose the External Learning Tools option
- Choose the List View/Management link created in the LTI Link Creation section
- The link will appear on the page
You are now ready to start the activation. Please note to complete this activation, you will need to have a user account in eReserve Plus with the role of Site Manager. Following are the steps for activation
- Click on the link you created earlier
- You will be asked to authorise your Brightspace instance. Click on the button provided
- You will be presented with the login page for your eReserve Plus instance, login with you Site Manager account.
- Once authenticated you will see a notification saying your Brightspace instance has been authorised to use eReserve Plus
- Return to Bright space then reload the page
- Confirm the details are correct, such as the Course Code Filter, Roles are assigned correctly etc.
- Click on the Activate button.
Once the above steps have been completed you can then add the List View/Management link to other sites via the Existing Activities > External Learning Tools menu item. For resource links you can use Inset Stuff.