
5. CanvasLMS Integration
Throughout this section of the document there are details on getting your Canvas instance connected to eReserve Plus. It’s very important to read all of the details in Installation and complete all of the activities in this section which will result in a successful connection to eReserve Plus. Should you have any questions then please contact the eReserve Support Team at support@ereserve.com.au
5.1 Requirements
The eReserve Plus LTI 1.3 Tool has been tested with the latest release of Canvas supported by Instructure. It is recommended that you use a supported version of Canvas however the eReserve Plus LTI Tool has been tested with earlier versions without incident.
5.2 Developer Key Creation
In this section, you will be required to create a Developer Key which will allow your instance of eReserve Plus to connect to Canvas using LTI 1.3.
To create a Developer Key, you will need to be logged in as an Administrator user of CanvasLMS instance and navigate to Admin > YourAccount > Developer Keys.
From there, select + Developer Keys and create a new + LTI Key.
Once selected, you will be presented with the LTI Developer Key creation form.
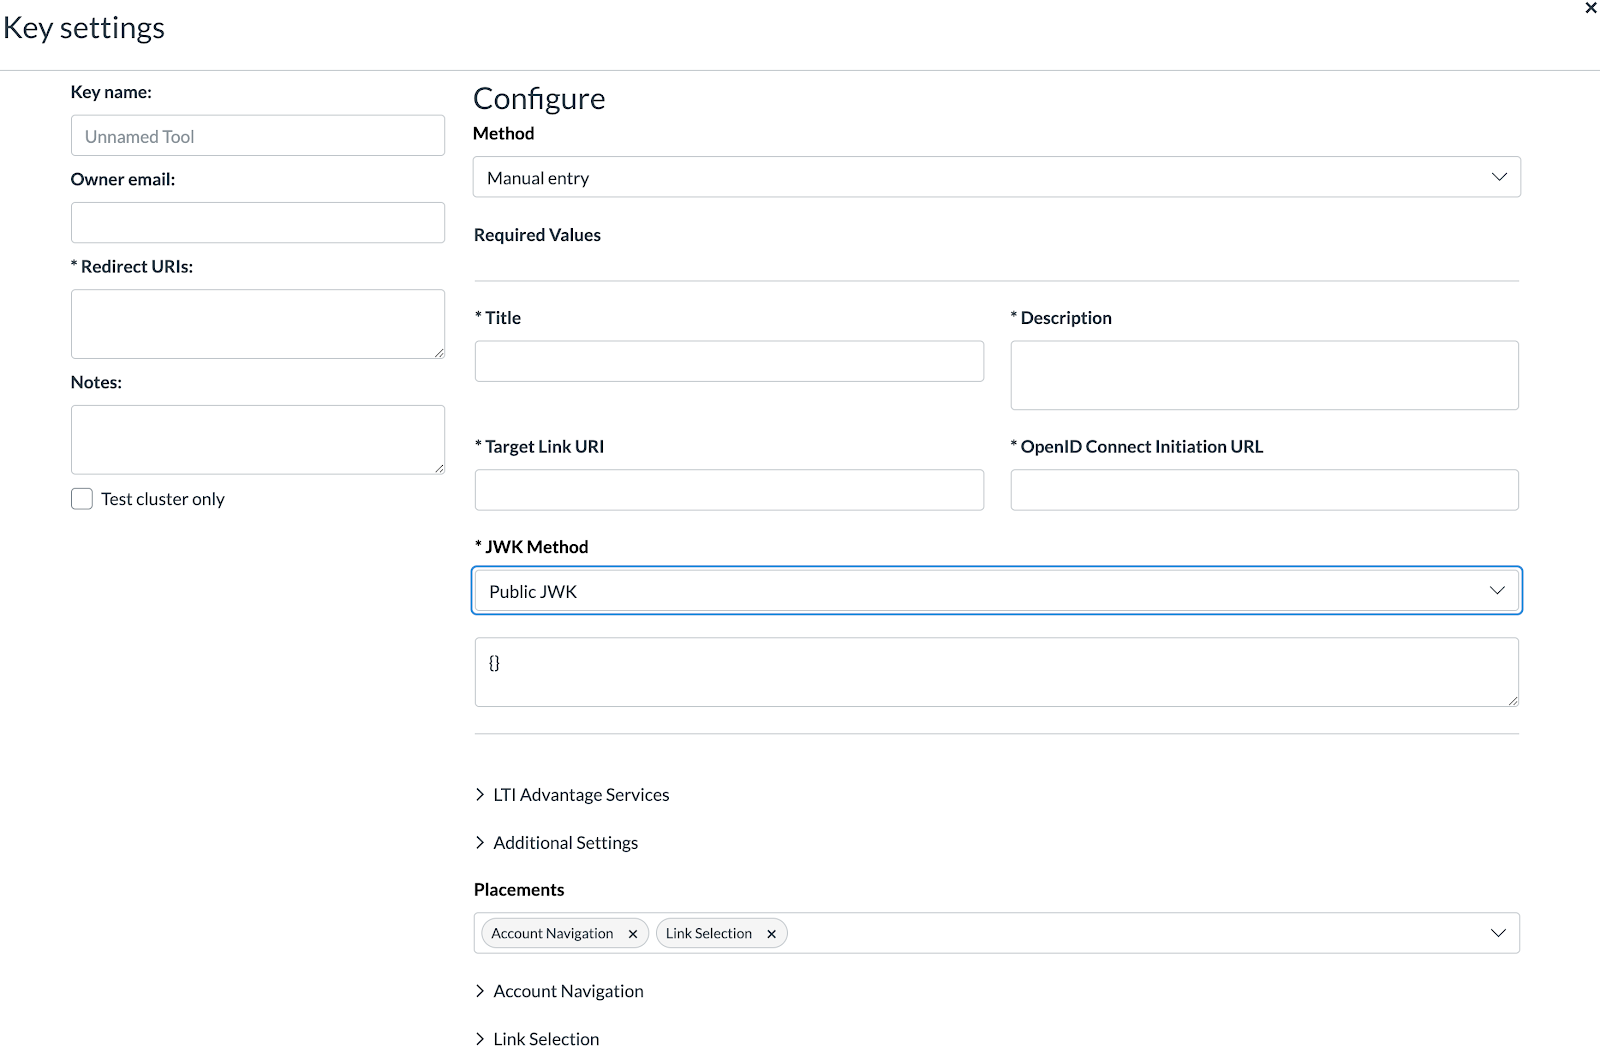
1. Key Name:
This name is for you to identify this developer key in the list of developer keys. You can name it as you see fit.
2. Redirect URLS: You will need to provide the following URLs to allow CanvasLMS to redirect to during launches and to use the eReserve Plus Embedded Resources (Resource Linking) feature:
Production Redirect URL:
- https://[ereserve].institution.edu.au/app/integration/lti/reading_list/launch
- (e.g https://ereserve.elysium.edu.au/app/integration/lti/reading_list/launch where "ereserve" is the Domain Name and "elysium" is the institution name)
Production Generate URL:
- https://[ereserve].institution.edu.au/app/integration/lti/resource_link/generate
- (e.g https://ereserve.elysium.edu.au/app/integration/lti/resource_link/generate where "ereserve" is the Domain Name and "elysium" is the institution name)
Production Resource Link URL:
- https://[ereserve].institution.edu.au/app/integration/lti/resource_link
- (e.g https://ereserve.elysium.edu.au/app/integration/lti/resource_link where "ereserve" is the Domain Name and "elysium" is the institution name)
Staging Redirect URL:
- https://[ereserve]-staging.institution.edu.au/app/integration/lti/reading_list/launch
- (e.g https://ereserve-staging.elysium.edu.au/app/integration/lti/reading_list/launch where "ereserve-staging" is the Domain Name and "elysium" is the institution name)
Staging Generate URL:
- https://[ereserve]-staging.institution.edu.au/app/integration/lti/resource_link/generate
- (e.g https://ereserve-staging.elysium.edu.au/app/integration/lti/resource_link/generate where “ereserve-staging” is the Domain Name and “elysium” is the institution name)
Staging Resource Link URL:
- https://[ereserve]-staging.institution.edu.au/app/integration/lti/resource_link
- (e.g https://ereserve-staging.elysium.edu.au/app/integration/lti/resource_link where “ereserve-staging” is the Domain Name and “elysium” is the institution name)
3. Method:
Choose the Manual method for creation of the developer key
4. Title:
This is the name of the tool used in its placement (e.g. Course Navigation, Link Selection, etc). This will be visible to academics and students so choose an appropriate name to suit your internal vocabulary such as Reading List, Course Resources, etc
5. Description:
A brief description about the LTI Tool (i.e. eReserve Plus)
6. Target Link URL: This is the general launch URL for this developer key. You will need to provide the following launch URL here:
Production Target Link URL:
- https://[ereserve].institution.edu.au/app/integration/lti/reading_list/launch
- (e.g https://ereserve.elysium.edu.au/app/integration/lti/reading_list/launch where "ereserve" is the Domain Name and "elysium" is the institution name)
Staging Target Link URL:
- https://[ereserve]-staging.institution.edu.au/app/integration/lti/reading_list/launch
- (e.g https://ereserve-staging.elysium.edu.au/app/integration/lti/reading_list/launch where "ereserve" is the Domain Name and "elysium" is the institution name)
7. OpenID Connect Initiation URL: As a part of the authentication process Canvas LMS will require the eReserve Plus OpenID URL which is as follows:
Production OpenID Connect Initiation URL:
- https://[ereserve].institution.edu.au/app/integration/lti/login
- (e.g. https://ereserve.elysium.edu.au/app/integration/lti/login where "ereserve" is the Domain Name and "elysium" is the institution name)
Staging OpenID Connect Initiation URL:
- https://[ereserve]-staging.institution.edu.au/app/integration/lti/login
- (e.g. https://ereserve-staging.elysium.edu.au/app/integration/lti/login where "ereserve" is the Domain Name and "elysium" is the institution name)
8. JWK Method:
Choose the Public JWK as the method and complete the following sub-steps to obtain the JSON to enter. In another internet tab/window, visit the following URL:
Production JWK Method URL:
- https://[ereserve].institution.edu.au/app/integration/lti/public_jwk.json
- (e.g. https://ereserve.elysium.edu.au/app/integration/lti/public_jwk.json where "ereserve" is the Domain Name and "elysium" is the institution name)
Staging JWK Method URL:
- https://[ereserve]-staging.institution.edu.au/app/integration/lti/public_jwk.json
- (e.g. https://ereserve-staging.elysium.edu.au/app/integration/lti/public_jwk.json where "ereserve" is the Domain Name and "elysium" is the institution name)
Copy the resulting JSON displayed on the page and paste into the provided field for the JWK Method.
9. Additional Settings: In the Additional Settings, the Domain field will need to be populated with the domain of the eReserve Plus environment that you are currently using for your CanvasLMS along with the Privacy Level being set to Public in order for the Developer Key and App to function correctly
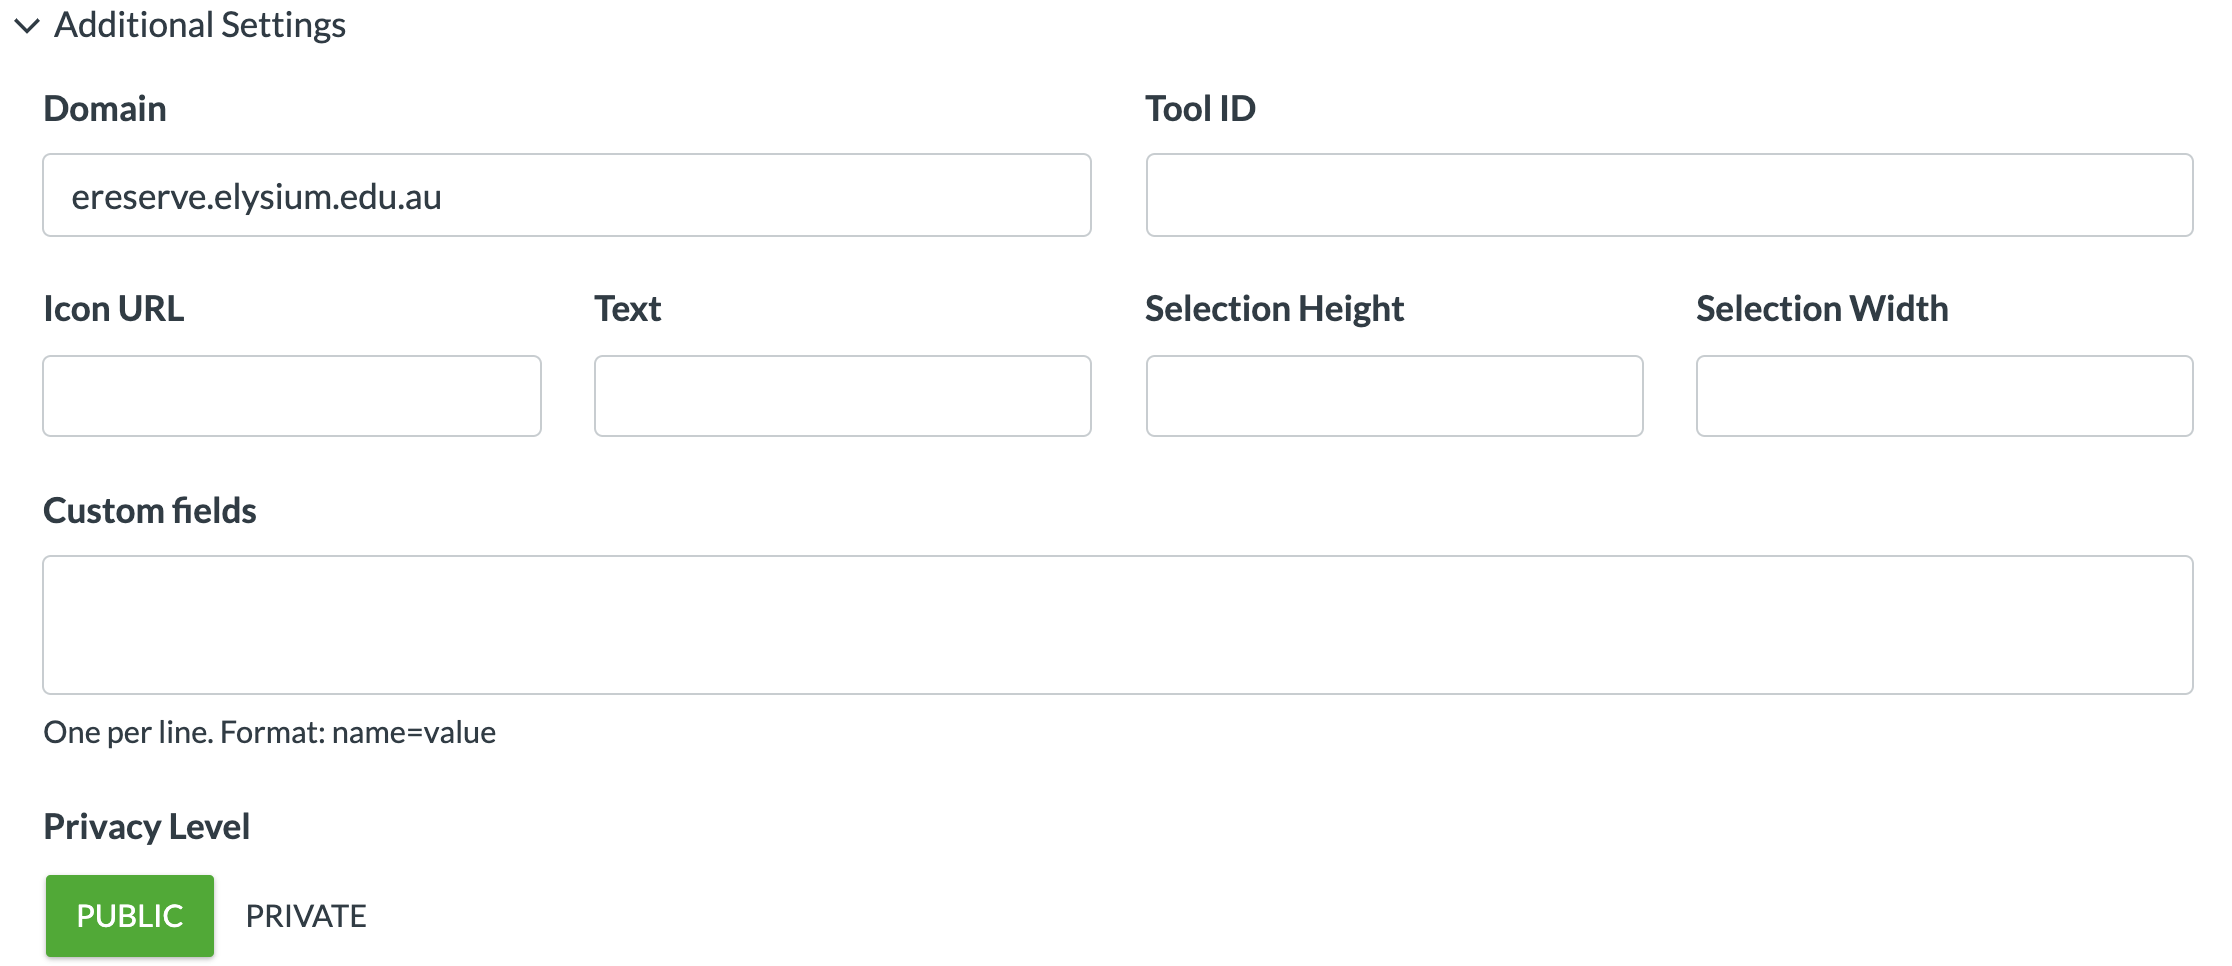
Production Domain:
- [ereserve].institution.edu.au
- (e.g ereserve.elysium.edu.au where “ereserve” is the Domain Name and “elysium” is the institution name)
Staging Domain:
- [ereserve]-staging.institution.edu.au
- (e.g ereserve-staging.elysium.edu.au where “ereserve-staging” is the Domain Name and “elysium” is the institution name)
10. Placements: There are 3 placements which are required. Course Navigation, Account Navigation and Editor Button placements will allow the Developer Key to be visible to users.

An example of the above with the information filled out can be found below.
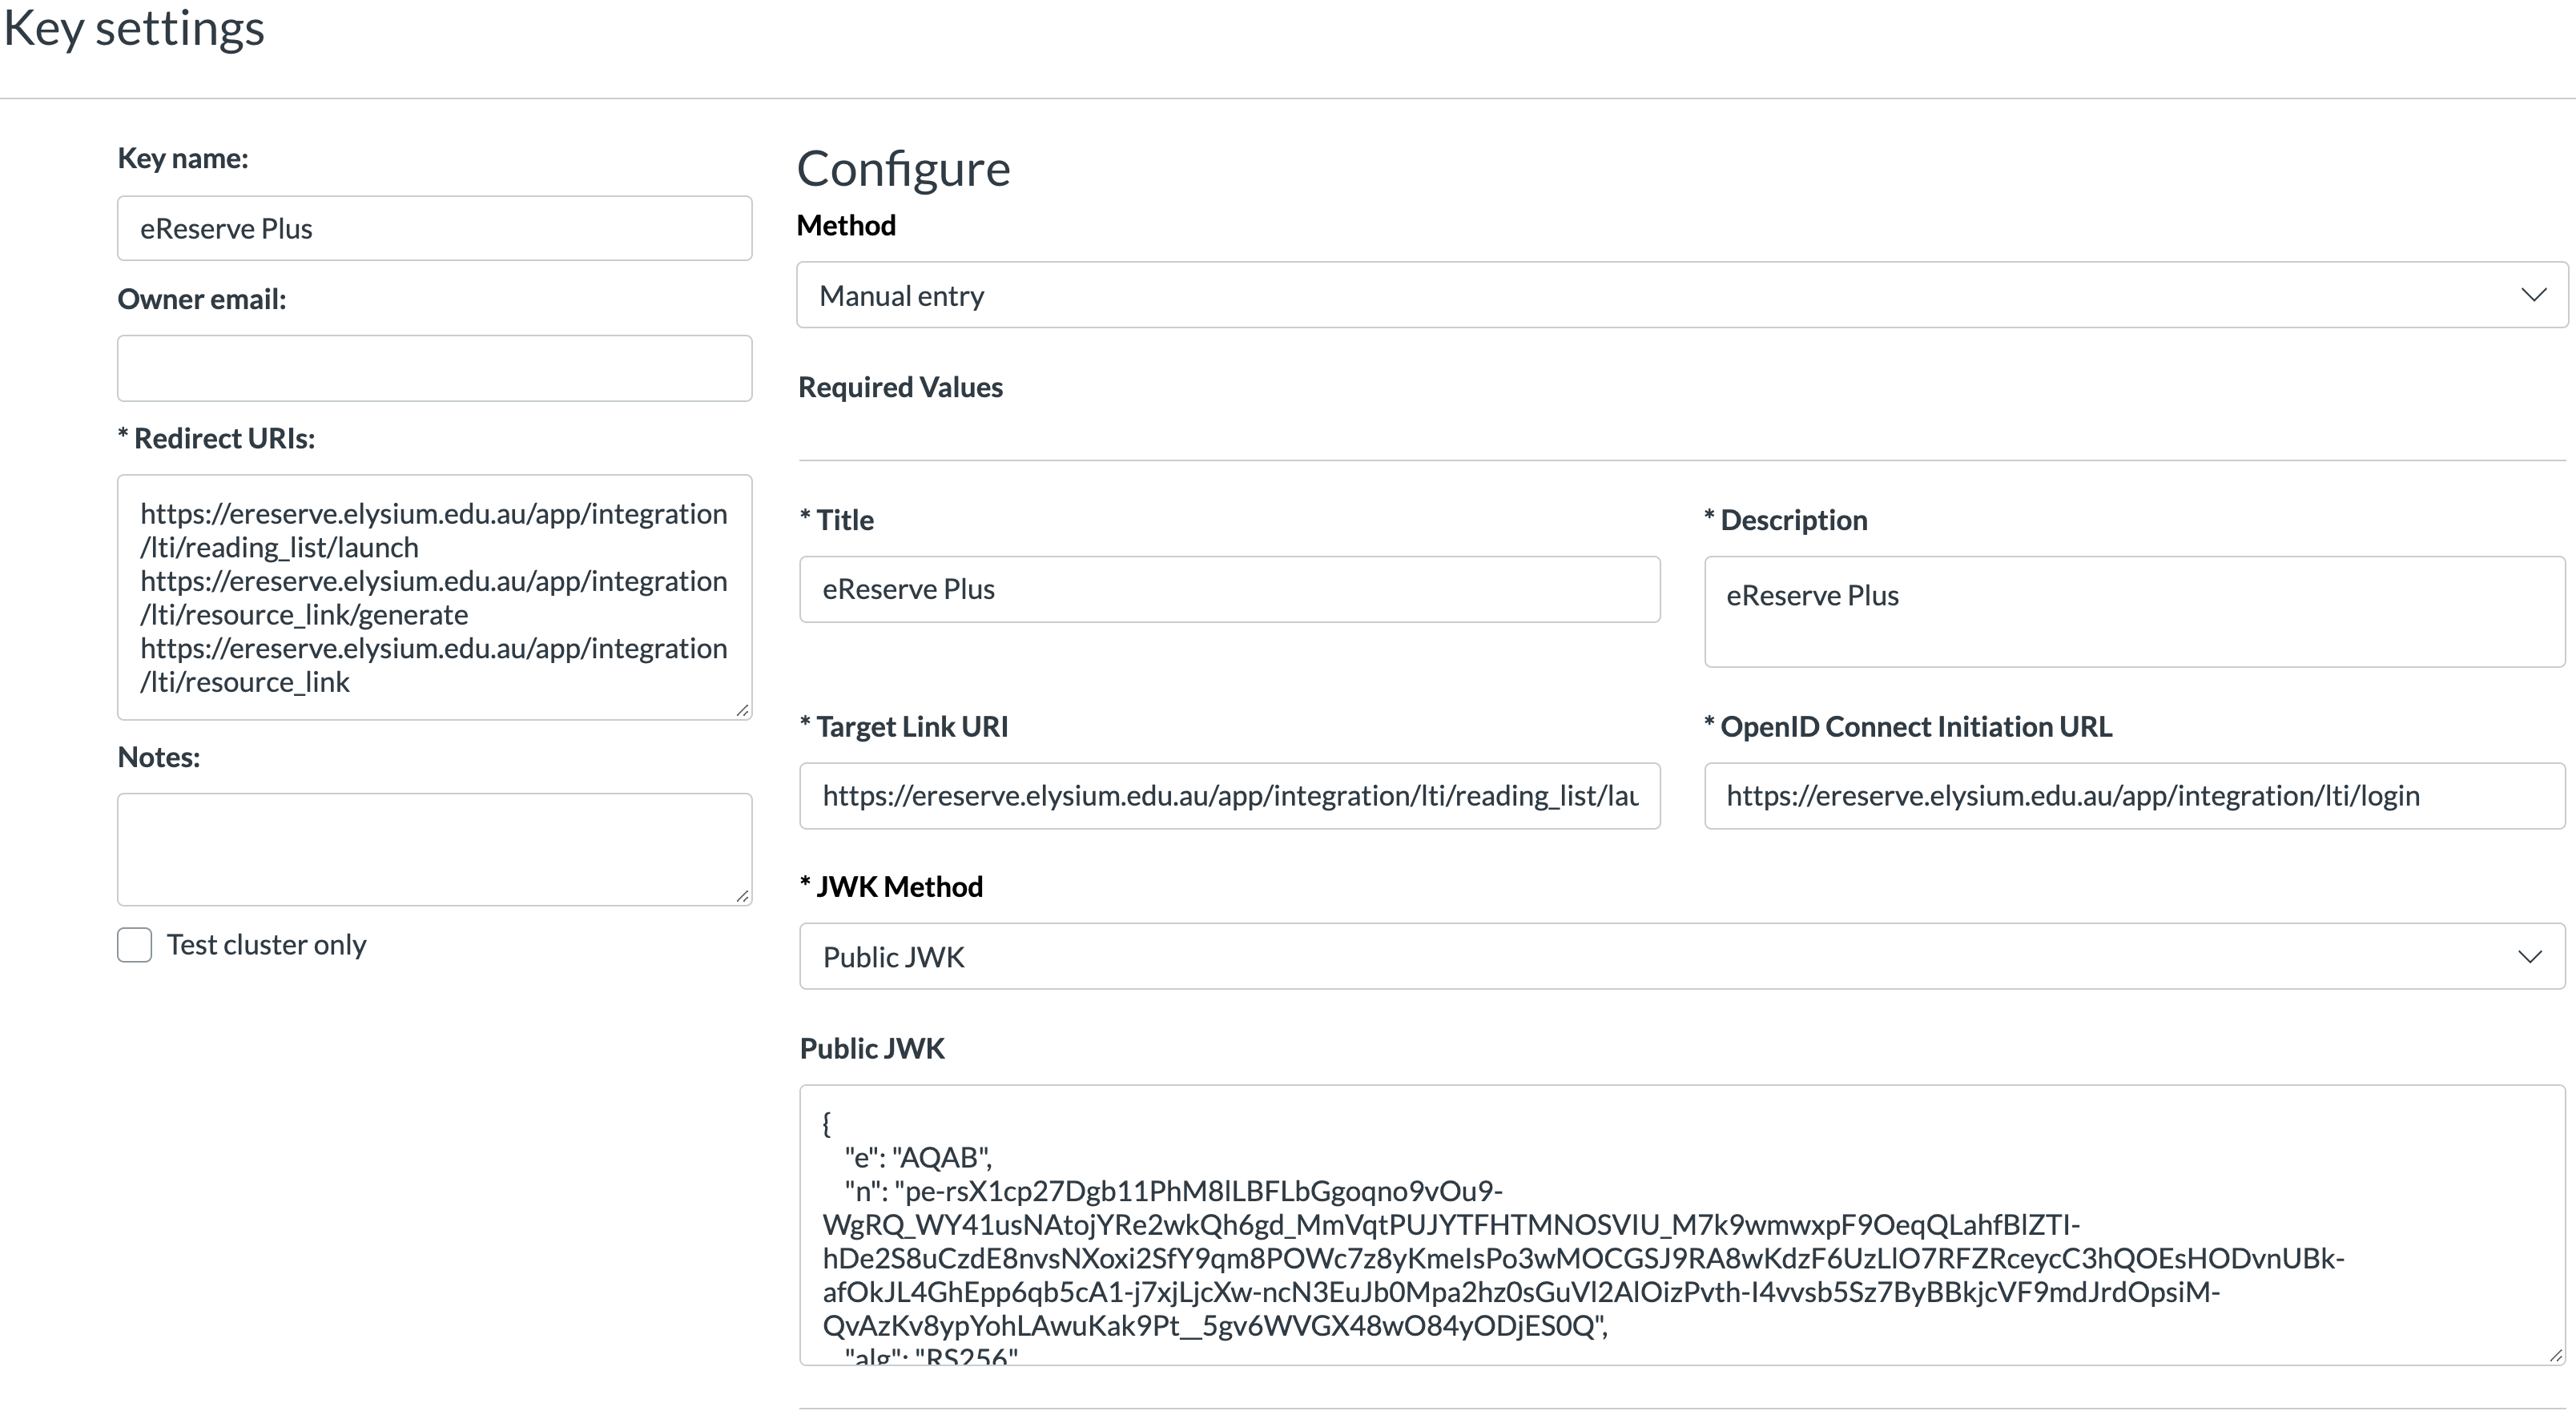
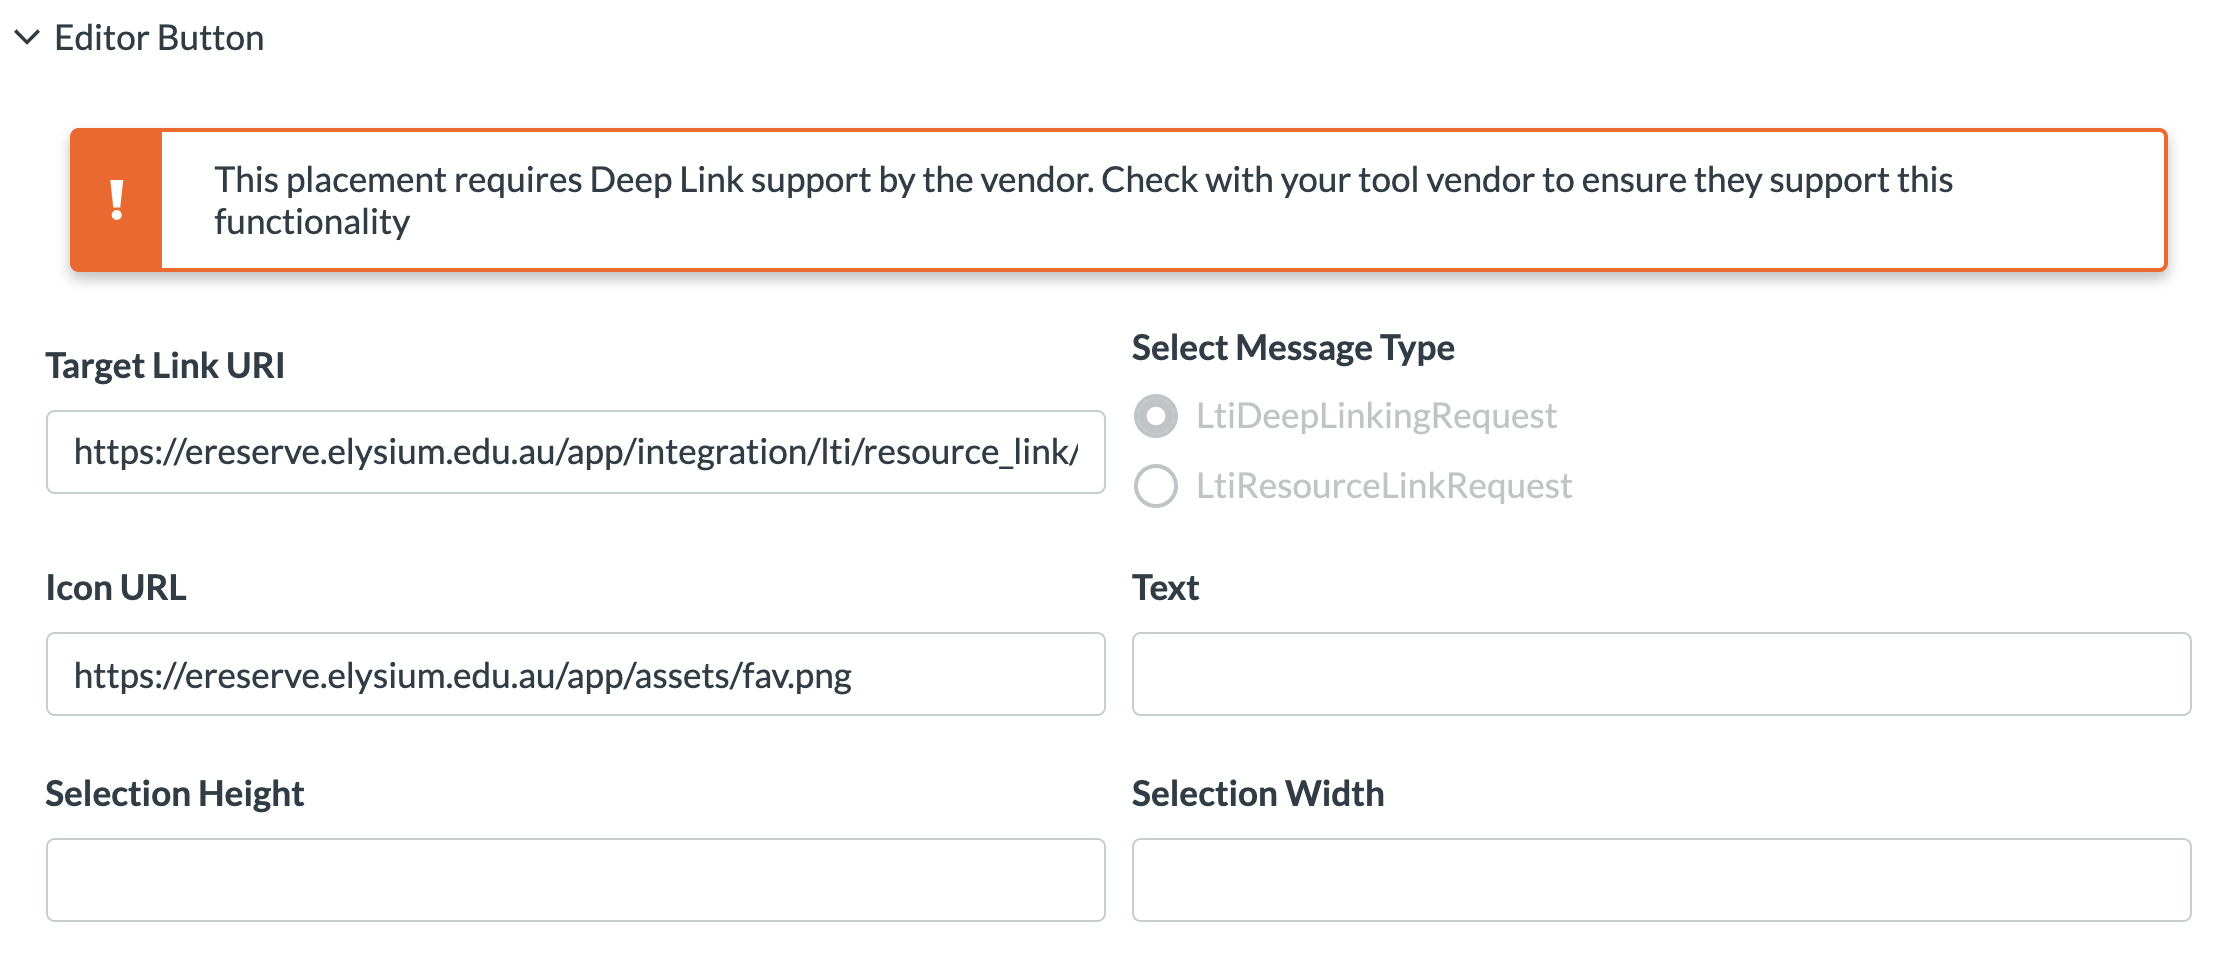
11. Editor Button: In the Editor Button section, the Target Link URL and the Icon URL will need to be populated with the following URLs:
Production Target Link URL:
- https://[ereserve].institution.edu.au/app/integration/lti/resource_link/generate
- (e.g https://ereserve.elysium.edu.au/app/integration/lti/resource_link/generate where "ereserve" is the Domain Name and "elysium" is the institution name)
Production Icon URL:
- https://[ereserve].institution.edu.au/app/assets/fav.png
- (e.g https://ereserve.elysium.edu.au/app/assets/fav.png where "ereserve" is the Domain Name and "elysium" is the institution name)
Staging Target Link URL:
- https://[ereserve]-staging.institution.edu.au/app/integration/lti/resource_link/generate
- (e.g https://ereserve-staging.elysium.edu.au/app/integration/lti/resource_link/generate where “ereserve-staging” is the Domain Name and “elysium” is the institution name)
Staging Icon URL:
- https://[ereserve]-staging.institution.edu.au/app/assets/fav.png
- (e.g https://ereserve-staging.elysium.edu.au/app/assets/fav.png where “ereserve-staging” is the Domain Name and “elysium” is the institution name)
5.3 App Creation
Once the Developer Key has been created, you will need to install the Developer Key as an App. Below are the steps to follow to add the Client ID as an External Learning Tool.
1. Client ID:
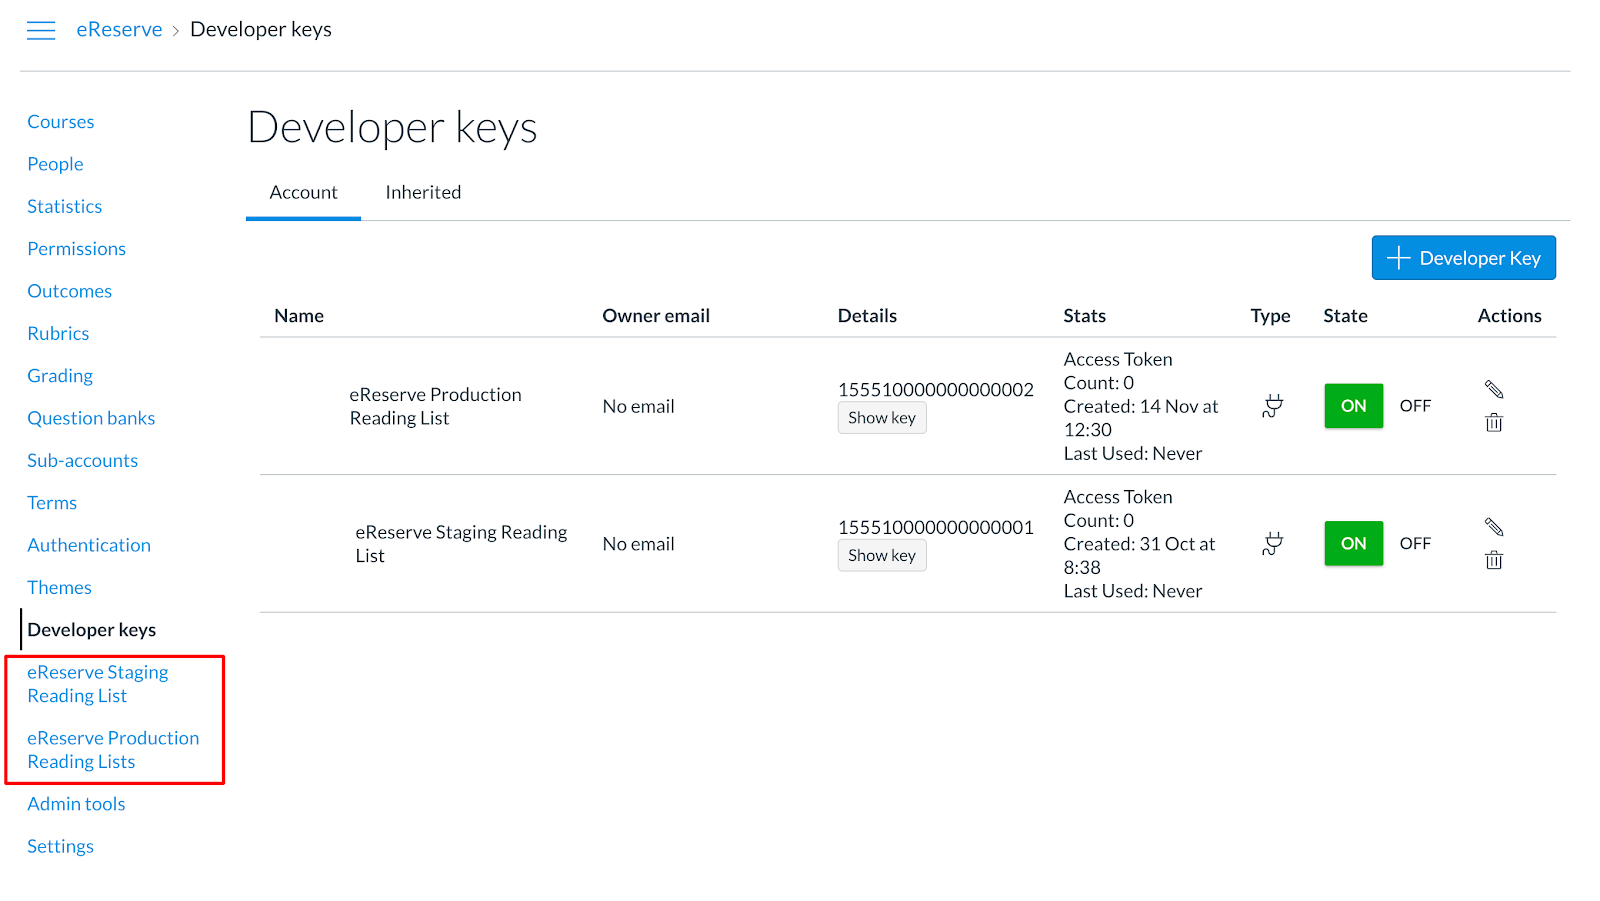
The Client ID is the long number that is in the Developer Key record under the section Details (see image below with red box)
2. State:
Ensure that the new Developer Key has the State of On to allow for it to be created as an App.

3. App Configuration
Create the App by navigating to Settings > Apps > View App Configurations > + App
4. Configuration Type
The Configuration Type that should be selected is the By Client ID option where you will be asked to enter the Client ID from the Developer Key
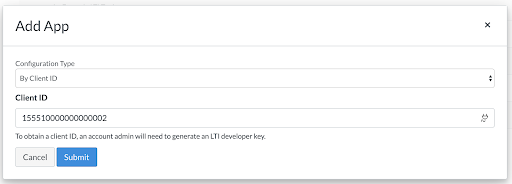
Once the above has been completed, you will have an install dialog box display where you can complete the installation of the App
When the Tool has been installed, the name of the External Learning Tool will be displayed on the left sidebar navigation of the Administration home page. From that link you can start the process of registering your Canvas LMS with eReserve Plus which can be found in the next section of this document.
5.4 Authorisation
Once the Developer Key has been created and setup, registration of your Canvas LMS with eReserve Plus can be completed by clicking on the Developer Key Title in the sidebar navigation of the Administration home page. This was entered in step 4 of the developer key creation.
NB: You will need to be logged in as a Canvas LMS Administrator and also have an eReserve Plus account with the Role of Site Manager in your institution's eReserve Plus instance which matches your Canvas LMS instance (i.e. For Staging environment configuration, you will need to have an eReserve Plus account with the Site Manager Role in your eReserve Plus Staging instance to complete the registration).
The first message displayed is the IMS LTI Platform Authorisation which outlines that your platform has not been authorised to use eReserve Plus. In order to Authorise the platform, click Authorise and you will be taken to the Admin interface of eReserve Plus where you will need to have Site Manager role to complete the authorisation.
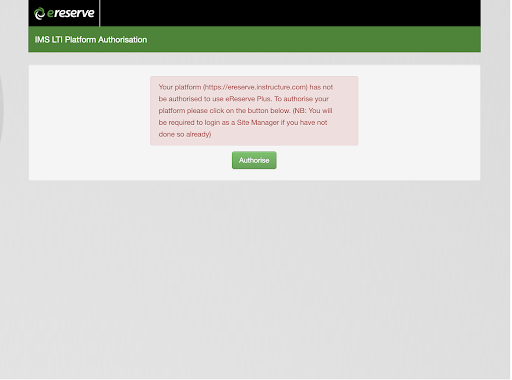
On Authorisation you will see a notice appear at the top of the eReserve Plus Integration Management page. This notice will contain details of the success or failure to authorise your Canvas LMS to use your institution’s eReserve Plus instance.
5.5 Activation
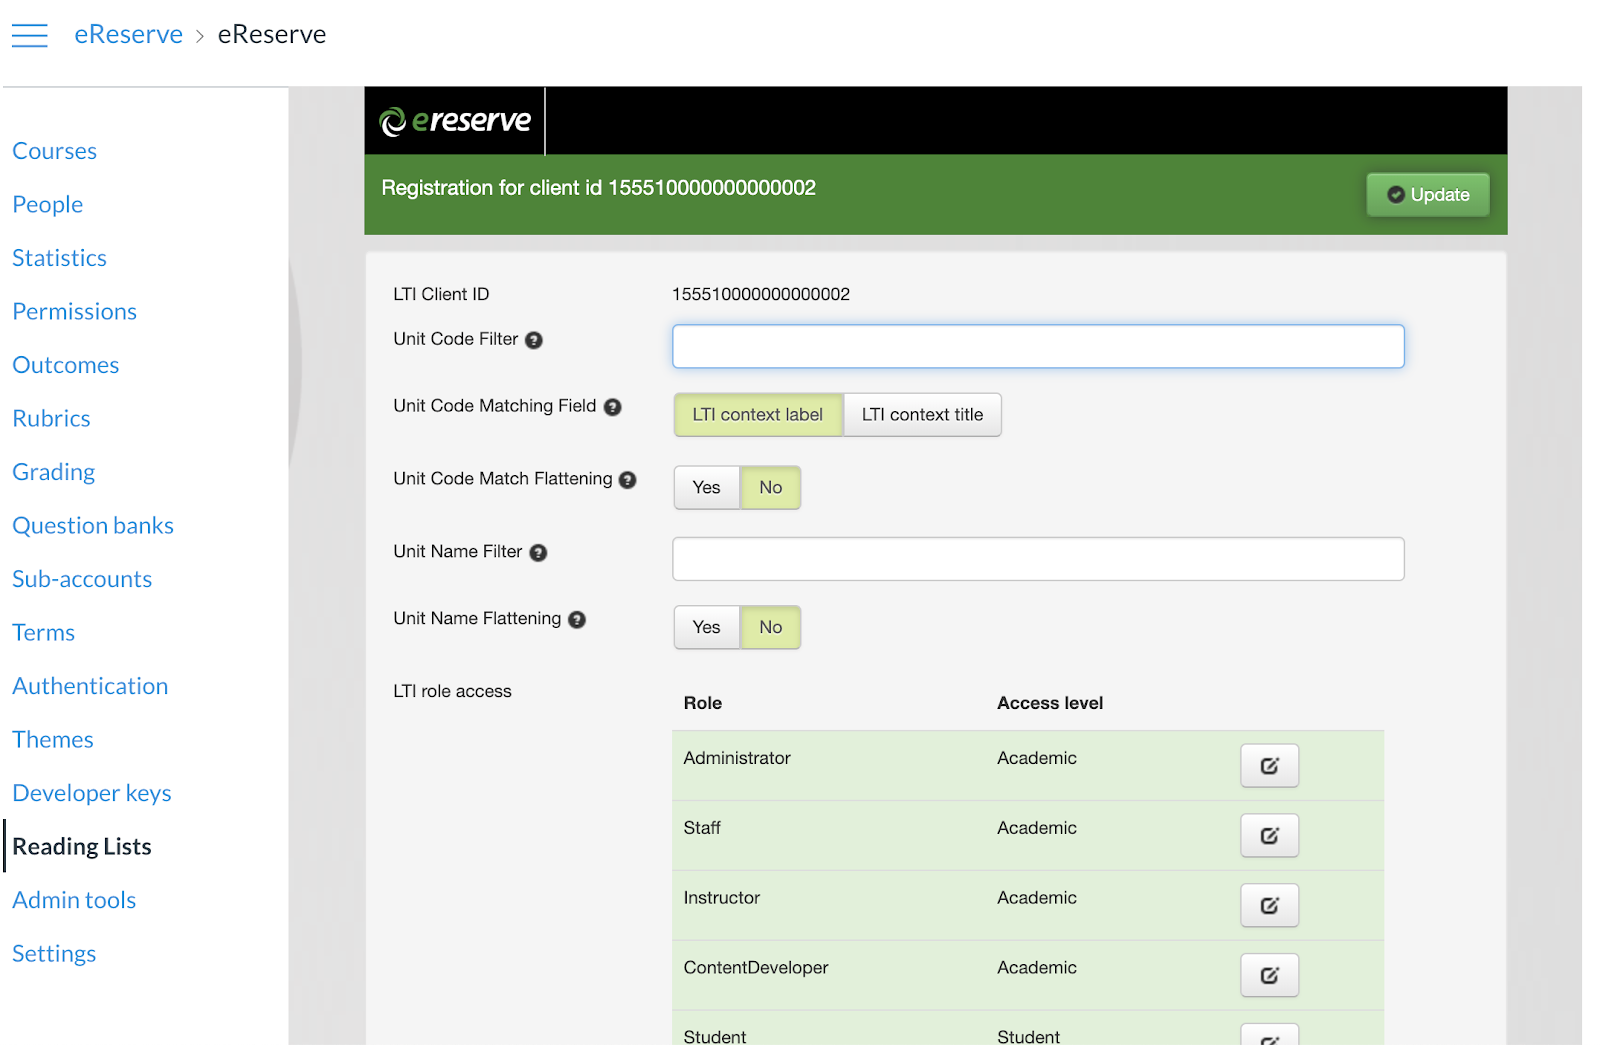
Once you have authorised the platform (i.e. your Canvas LMS instance), you will be asked to refresh your page and then complete the Activation of the Registration (see below) for your platform so that users will be able to access eReserve Plus via the Canvas LMS instance. The on-screen details will display the LTI Client ID which should match that of the Developer Key ID.
Complete the form then click Activate to complete the process.
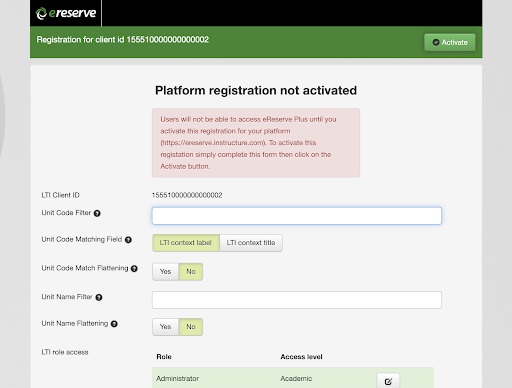
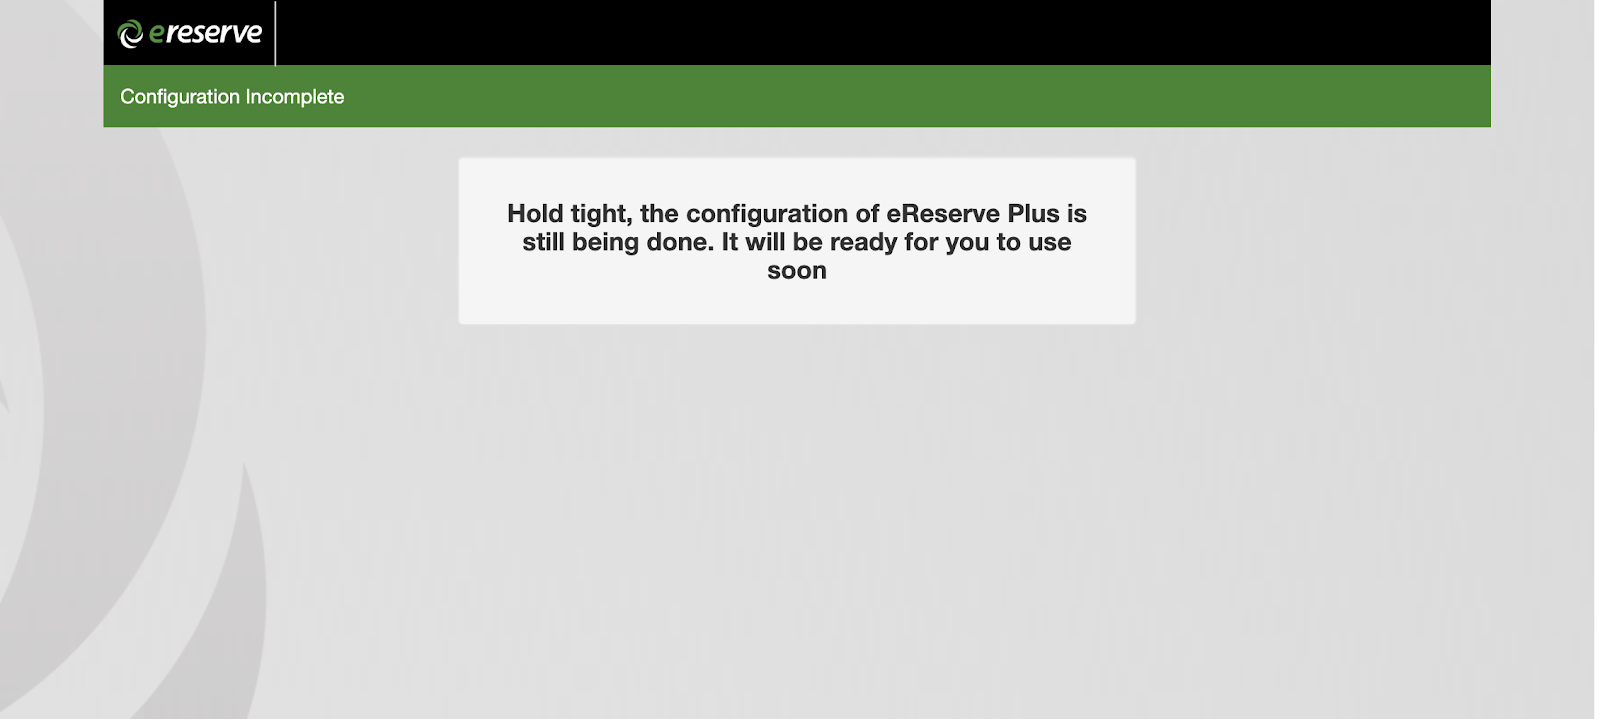
It’s important to note that at this stage the placements will appear in your Canvas LMS. So placement link “Course Navigation” will be visible for students and academics. Should they click on the link they will be presented with a page (see below) alerting them that eReserve Plus is yet to be activated.
5.6 Testing your Configuration
Once you have completed the activation, eReserve Plus will be accessible in the placements that you have chosen (see the Course Navigation placement example below). Each user accessing eReserve Plus through the placement will be presented with the appropriate eReserve Plus page depending on their Canvas LMS role.
This completes the configuration of Resource Linking with the CanvasLMS.
To learn more about eReserve Plus Resource Linking from a User perspective in the CanvasLMS, please visit our Embedded Resources with CanvasLMS.